

When the summer heat starts to crank up, there’s nothing quite like stepping into a car with a cool, refreshing breeze. But what happens when your car’s air conditioning begins to blow warm air instead? Before rushing to the mechanic or reaching for your wallet, there’s a simple solution you can try yourself: recharging your car’s AC system. With a few basic tools, some patience, and this step-by-step guide, you can bring back that chill and save both time and money. Whether you’re a seasoned DIY enthusiast or a curious beginner, this article will walk you through the essential process of DIY car AC recharge—helping you stay cool, calm, and collected all summer long.
Table of Contents
- Choosing the Right Refrigerant for Your Vehicle’s AC System
- Gathering Essential Tools and Safety Gear for a Smooth Recharge
- Preparing Your Car and Locating the AC Service Ports
- Properly Connecting the Recharge Kit for Accurate Filling
- Monitoring Pressure Levels and Avoiding Common Pitfalls
- Testing and Maintaining Your AC System Post-Recharge
- Q&A
- The Conclusion

Choosing the Right Refrigerant for Your Vehicle’s AC System
Selecting the appropriate refrigerant for your vehicle’s AC system is crucial for optimal cooling performance and environmental safety. Most vehicles manufactured after 1994 use R-134a refrigerant, while newer models from 2015 onwards might require the more eco-friendly R-1234yf. Using the wrong type not only compromises your AC’s efficiency but could also damage the system components or violate environmental regulations. Always check your owner’s manual or the label under the hood, which typically specifies the exact refrigerant type recommended by the manufacturer.
When deciding on a refrigerant, consider factors such as compatibility, availability, and environmental impact. Here’s a quick reference for common refrigerants:
| Refrigerant Type | Compatible Vehicles | Global Warming Potential (GWP) | Notes |
|---|---|---|---|
| R-12 (Freon) | Pre-1994 models | High | Phased out due to ozone depletion |
| R-134a | 1994-2015 vehicles | Moderate | Widely available; standard choice for many years |
| R-1234yf | 2015 and newer models | Low | Environmentally friendly alternative |
- Tip: Never mix refrigerants—this can lead to compressor failure.
- Important: Use only certified refrigerants that meet automotive standards.

Gathering Essential Tools and Safety Gear for a Smooth Recharge
Before diving into the recharge process, it’s crucial to have all your tools and safety gear organized to ensure a hassle-free experience. Start with the basics: a refrigeration-grade gauge manifold set to monitor pressure levels accurately, and a can of the specific refrigerant compatible with your vehicle. Don’t forget a vacuum pump to evacuate old refrigerant and moisture from the system, ensuring maximum efficiency. Having a leak detector kit on hand can save you from costly mistakes by identifying any vulnerabilities before refilling the system. Equipping yourself with a set of screwdrivers and wrenches ensures you can handle any unexpected loose fittings or clamps during the job.
Safety should never be an afterthought—prioritize protective gear such as gloves, safety goggles, and a long-sleeved shirt to shield your skin from refrigerant burns and exposure. Working in a well-ventilated area prevents inhaling harmful gases, and having a reliable fire extinguisher nearby provides peace of mind. Below is a quick reference table to help you confirm you have all essentials ready:
| Tool / Gear | Purpose | Tip |
|---|---|---|
| Gauge Manifold Set | Monitor system pressure | Check compatibility with your refrigerant |
| Refrigerant Can | Recharge AC system | Use only manufacturer-recommended type |
| Vacuum Pump | Remove old refrigerant/moisture | Run for at least 30 minutes |
| Leak Detector | Identify leaks | Use before recharge |
| Protective Gloves & Goggles | Personal safety | Ensure proper fit to avoid skin contact |
| Screwdrivers & Wrenches | Adjust and tighten fittings | Keep handy throughout the process |

Preparing Your Car and Locating the AC Service Ports
Before diving into the recharge process, it’s crucial to ensure your vehicle is ready for a smooth and efficient job. Start by parking your car in a shaded, level area to prevent any heat interference with the AC components. Switch off the engine and pop the hood, giving you easy access to the engine bay. Gathering all the necessary tools and safety gear in advance will save you time later on; this includes gloves, protective eyewear, and your recharge kit. Taking these preparatory steps ensures both safety and convenience throughout the project.
Next, identifying the AC service ports is key to correctly connecting your recharge kit. Most vehicles are equipped with two service ports: a low-pressure port and a high-pressure port. The low-pressure port is typically found on the larger diameter tubing and is usually located between the compressor and the evaporator. To help you quickly spot these ports, here’s a handy comparison table:
| Service Port | Location | Size | Cap Color |
|---|---|---|---|
| Low-Pressure | Larger tubing | Larger diameter | Black or blue |
| High-Pressure | Smaller tubing | Smaller diameter | Red |
- Always connect the recharge hose to the low-pressure port.
- Check the port caps for equilibrium; ensure they’re tightly sealed before use.
- Consult your owner’s manual if the port locations vary by model.

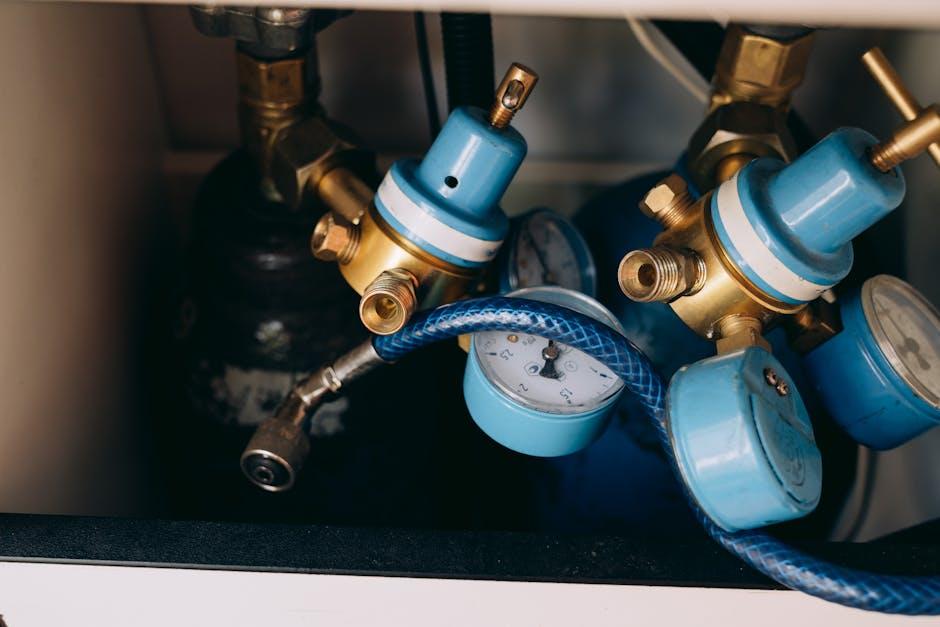
Properly Connecting the Recharge Kit for Accurate Filling
Before you start, ensure that your vehicle is parked on a level surface with the engine off and completely cooled down. Begin by securing the recharge kit’s hose to the low-pressure AC port, typically marked with a blue or black cap. Double-check the connection to ensure there are no leaks or loose fittings. Use gentle pressure when attaching the hose to avoid damaging the valve stem, and listen for any hissing sounds that could indicate escaping refrigerant.
Once the hose is attached securely, connect the pressure gauge to monitor the system’s status accurately. The gauge will help you keep track of the refrigerant levels so that you avoid overcharging. Below is a quick reference for safe pressure ranges based on your car’s engine size:
| Engine Size | Typical Low-Side Pressure (PSI) |
|---|---|
| 1.5L – 2.5L | 25 – 35 |
| 2.6L – 3.5L | 30 – 40 |
| 3.6L & above | 35 – 45 |
- Do not mix refrigerants: Use only the recommended type for your vehicle.
- Wear protective gloves and goggles to avoid any accidental exposure.
- Maintain steady hand pressure on the hose to keep consistent flow during filling.
Monitoring Pressure Levels and Avoiding Common Pitfalls
Keeping a close eye on pressure levels during your DIY car AC recharge is essential to ensure optimal performance and avoid damage. Use a reliable pressure gauge to monitor the system’s readings consistently, and remember that both excessively high and low pressures can indicate underlying issues. High pressure may suggest an overcharge or blockages, while low pressure often points to leaks or insufficient refrigerant. To maintain balance, always compare the readings to the manufacturer’s recommended specifications, which can usually be found in your vehicle’s manual or on a sticker in the engine bay.
Beware of common pitfalls that can derail your recharge process. Never rush the refill—adding refrigerant too quickly may cause freezing or pressure spikes. Also, avoid working with a hot engine; let it cool down to prevent inaccurate pressure readings and potential safety hazards. When connecting hoses, ensure all fittings are tight to prevent refrigerant leaks, and always wear safety goggles and gloves. Below is a quick checklist to help you sidestep frequent mistakes:
- Check and record initial pressure before adding refrigerant
- Add refrigerant slowly and in small increments
- Operate the AC system during recharge to observe pressure changes
- Monitor ambient temperature as it affects pressure readings
- Avoid overcharging to protect the compressor and other components

Testing and Maintaining Your AC System Post-Recharge
Once your AC system has been recharged, it’s essential to verify its performance to ensure optimal cooling efficiency. Begin by running the engine and turning the AC to the highest setting. Use a thermometer to measure the air temperature from the vents, which should ideally drop to around 40-50°F (4-10°C) within a few minutes. Additionally, listen carefully for any unusual hissing or rattling noises that might indicate leaks or component issues. Checking the pressure gauge readings against manufacturer recommendations can also provide a clear picture of whether the refrigerant levels are balanced correctly.
Keeping your AC system in good shape post-recharge involves regular upkeep and attention. Incorporate these simple maintenance steps into your routine:
- Inspect for leaks: Periodically check hoses and connections for any signs of oil residue or moisture.
- Clean the condenser: Remove debris from the front grille area to maintain airflow and efficiency.
- Replace cabin air filters: Fresh filters improve air quality and system performance.
- Run the AC regularly: Even in colder months, this keeps seals lubricated and prevents system degradation.
| Maintenance Task | Recommended Frequency | Benefit |
|---|---|---|
| Visual Leak Inspection | Monthly | Prevents refrigerant loss |
| Condenser Cleaning | Every 6 months | Improves cooling efficiency |
| Cabin Air Filter Replacement | Every 12,000 miles | Enhances airflow and air quality |
| AC System Activation | Weekly | Keeps system components lubricated |
Q&A
Q&A: DIY Car AC Recharge – Step-by-Step Guide
Q1: Why should I consider recharging my car’s AC myself?
A: Recharging your car’s AC can save you money, time, and a trip to the mechanic. If your AC isn’t blowing cold air, it might just need a refrigerant top-up, which is often a straightforward task. Plus, doing it yourself gives you a better understanding of your vehicle’s cooling system.
Q2: How do I know if my car’s AC actually needs a recharge?
A: Common signs include warm or lukewarm air coming through the vents, longer cooling times, or a noticeable decrease in airflow. You might also notice the AC compressor clutch cycling more frequently or hear unusual noises. Checking the pressure with a gauge is the most reliable method.
Q3: What tools and materials will I need?
A: You’ll need an AC recharge kit (usually comes with refrigerant and a pressure gauge), safety glasses, gloves, and basic car maintenance knowledge. The kit will specify the type of refrigerant compatible with your vehicle—make sure to check your owner’s manual.
Q4: How do I find the correct refrigerant type for my car?
A: Look for a sticker under the hood or consult your vehicle’s owner’s manual. The most common types are R-134a and R-1234yf, but using the wrong type can damage your AC system.
Q5: What’s the step-by-step process to recharge the AC?
A:
- Prepare the vehicle: Park in a shaded area, turn off the engine, and open the hood.
- Locate the low-pressure port: It’s usually marked and has a smaller diameter than the high-pressure port.
- Attach the recharge hose: Connect the kit’s hose to the low-pressure port securely.
- Start the engine and AC: Set your AC to the highest cooling setting and fan speed.
- Check pressure: Use the gauge to measure the system pressure; this guides how much refrigerant to add.
- Add refrigerant slowly: Press the valve on the can to charge the system in short bursts, monitoring the pressure gauge.
- Stop when optimal pressure is reached: Avoid overcharging, which can harm the AC system.
- Disconnect and test: Remove the hose, check for leaks, and test if the air is cooling properly.
Q6: Are there any safety precautions I should be aware of?
A: Absolutely. Wear gloves and eye protection, work in a well-ventilated space, and never recharge the system if it’s leaking—leaks need professional repair. Also, avoid skin contact with refrigerant as it can cause frostbite.
Q7: What if my AC still isn’t cold after recharging?
A: The issue might be more complex, such as a leak, faulty compressor, or electrical problems. In that case, it’s best to consult a professional mechanic for a full diagnosis.
Q8: Can I recharge my car AC multiple times in a season?
A: Frequent recharges could indicate a leak or a bigger problem. Ideally, once charged, the system should hold refrigerant for months or longer. If you find yourself recharging often, get the AC system inspected.
Q9: How environmentally friendly are DIY AC recharge kits?
A: Modern refrigerants like R-134a and R-1234yf have less environmental impact than older types, but improper handling can still release harmful gases. Follow instructions carefully and dispose of empty cans responsibly.
Q10: Is recharging my car AC covered by a warranty or recommended by manufacturers?
A: Some warranties may void if improper DIY servicing causes damage. It’s a good idea to check your car’s warranty terms before proceeding and follow all manufacturer recommendations. When in doubt, professional servicing is safest.
This Q&A aims to empower you to take control of your car’s cooling with confidence, balancing cost-saving DIY spirit and responsible, safe practice!
The Conclusion
Recharging your car’s AC may seem like a daunting task, but with the right tools and a bit of patience, it’s a rewarding DIY project that can keep you cool without the trip to the mechanic. By following this step-by-step guide, you’ve taken control of your comfort and learned more about the inner workings of your vehicle. Remember to stay safe, double-check your work, and enjoy the refreshing breeze of a well-charged system. Here’s to many more miles of cool, comfortable driving—done your way!