

Beneath the hood of every vehicle lies a complex symphony of metal, oil, and engineering—your engine. Over time, this intricate masterpiece accumulates dirt, grime, and grease that can stealthily undermine its performance. Cleaning your engine properly is not just about aesthetics; it’s a vital ritual that helps maintain efficiency, prolongs lifespan, and keeps your ride running smoothly. In this guide, we’ll navigate the steps and precautions needed to bring that engine back to its gleaming, well-tuned best—without causing any unintended harm. Whether you’re a seasoned car enthusiast or a cautious beginner, understanding the right way to clean your engine can make all the difference.
Table of Contents
- Preparing Your Workspace for Safe and Effective Engine Cleaning
- Selecting the Right Cleaning Materials and Tools for Your Engine
- Step-by-Step Guide to Degreasing and Scrubbing the Engine Surface
- Protecting Sensitive Components During the Cleaning Process
- Rinsing and Drying Techniques to Prevent Damage and Corrosion
- Post-Cleaning Maintenance Tips for Long-Lasting Engine Performance
- Q&A
- Key Takeaways
Preparing Your Workspace for Safe and Effective Engine Cleaning
Before diving into the engine cleaning process, creating a well-organized and secure environment is essential for both safety and efficiency. Choose a flat, open area with ample lighting—natural light is ideal to spot grime and greasy spots easily. Lay down protective coverings such as plastic sheets or absorbent mats to catch runoff and prevent stains on your driveway or garage floor. Always disconnect the battery to avoid any accidental electrical surges, and keep a fire extinguisher nearby for unexpected emergencies. Good ventilation is a must, especially if you plan to use strong degreasers or solvents, as fumes can accumulate and pose health risks.
Gathering all necessary tools and supplies before starting will save you time and help maintain your workflow. Here’s a checklist of essentials every engine cleaning station should have:
- Protective gear: gloves, safety goggles, and a respirator mask
- Cleaning materials: degreaser, brushes (various sizes), microfiber cloths
- Water source: hose with a gentle spray nozzle or buckets of clean water
- Plastic bags and tape: to cover sensitive engine components and electrical parts
| Tool/Supply | Purpose |
|---|---|
| Degreaser | Breaks down oil and grime |
| Microfiber cloths | Avoid scratches during wiping |
| Protective gloves | Protects hands from chemicals |
| Plastic sheets | Prevents surface damage |

Selecting the Right Cleaning Materials and Tools for Your Engine
Choosing the right cleaning materials and tools is essential to achieve a spotless engine without causing any damage. Start by selecting a gentle degreaser specifically formulated for automotive engines; harsh chemicals can degrade rubber seals and wiring insulation. Pair your degreaser with a soft-bristle brush to loosen grime and dirt from hard-to-reach crevices without scratching delicate surfaces. Additionally, having a sturdy microfiber cloth on hand will help you wipe down surfaces efficiently while preventing streaks and residue buildup.
To keep your process organized and efficient, consider the tools and materials listed below:
- Plastic scraper: To remove thick grease without harming engine parts.
- Compressed air or leaf blower: For drying and removing loosened debris.
- Protective gloves and eyewear: To keep yourself safe from chemicals and dirt.
- Water-resistant tape or plastic bags: To shield sensitive electrical components during cleaning.
| Tool/Material | Purpose | Tip |
|---|---|---|
| Engine Degreaser | Removes oil and grime | Choose a biodegradable formula for eco-friendliness |
| Soft-Bristle Brush | Detailed scrubbing | Small size fits tight spots |
| Microfiber Cloth | Wiping and drying | Use separate cloths for dirty and clean areas |
| Protective Gear | Safety during cleaning | Ensure gloves are chemical-resistant |

Step-by-Step Guide to Degreasing and Scrubbing the Engine Surface
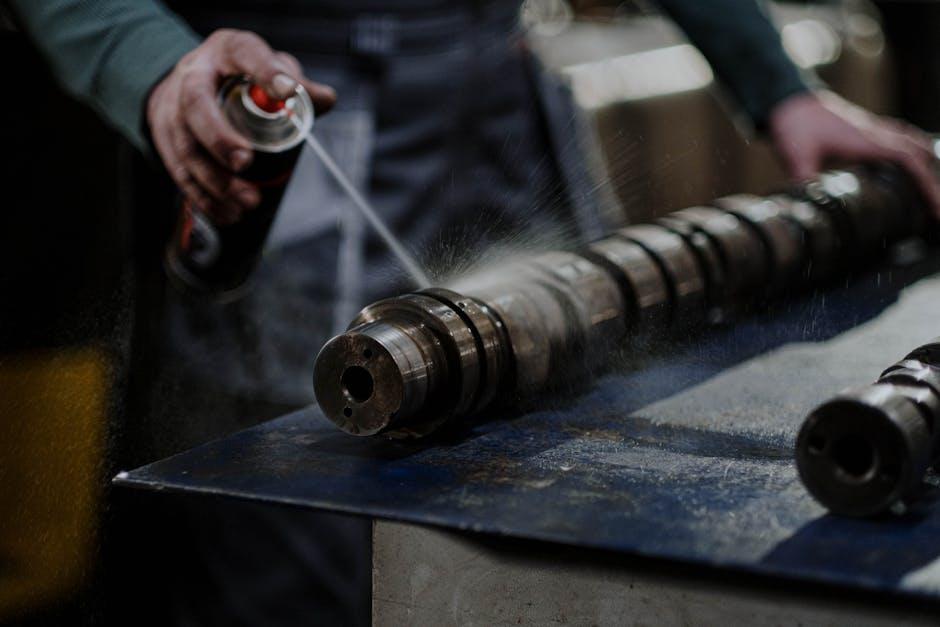
Begin by covering any electrical components, air intakes, and exposed filters with plastic bags or waterproof tape to protect them from water damage. Next, liberally spray the engine surface with a high-quality degreaser, ensuring that you reach into crevices and around bolts. Let the degreaser settle for 10 to 15 minutes to effectively break down grime and oil deposits. For stubborn stains, using a toothbrush or a soft-bristled brush will help agitate the surface gently without causing damage.
Once the degreaser has had time to work, use a garden hose with moderate water pressure or a spray bottle to rinse the engine thoroughly. Avoid high-pressure washers as they can force water into sensitive areas. To ensure a spotless finish, repeat the process if necessary, then dry the engine surface with microfiber towels or compressed air to prevent moisture buildup. Maintaining this routine not only improves engine aesthetics but also aids in early detection of leaks or wear.
- Protect sensitive parts before cleaning
- Apply degreaser evenly, focusing on greasy spots
- Use brushes for stubborn grime
- Rinse gently to avoid water intrusion
- Dry thoroughly to prevent corrosion
| Step | Action | Tip |
|---|---|---|
| 1 | Cover electrical parts | Use plastic bags and tape |
| 2 | Spray degreaser | Apply evenly and wait 15 mins |
| 3 | Scrub gently | Use soft brushes for delicate areas |
| 4 | Rinse with water | Avoid high-pressure jets |
| 5 | Dry completely | Microfiber towels or compressed air |
Protecting Sensitive Components During the Cleaning Process
Before diving into the cleaning phase, it’s essential to shield delicate engine elements that could be compromised by water or harsh chemicals. Components like the alternator, exposed wiring, and air intake systems require special attention. Using plastic bags or waterproof covers is a quick and effective way to guard these parts from moisture intrusion. Additionally, ensure any electrical connectors are sealed tightly, and avoid using high-pressure water jets directly on these sensitive areas.
Employing a strategic approach not only preserves the integrity of your engine but also saves you from costly repairs. Consider these protective measures:
- Cover electronic modules with cling film or specialized covers.
- Seal off air intakes using plastic or rubber plugs.
- Disconnect battery terminals to prevent short circuits during cleaning.
- Use gentle cleaning agents that are designed for automotive use.
| Component | Recommended Protection | Reason |
|---|---|---|
| Alternator | Plastic bag wrap | Prevents water damage to electrical windings |
| Battery Terminals | Disconnect and cover | Avoids electrical shorts |
| Air Intake | Seal with rubber plugs | Prevents debris and moisture entry |

Rinsing and Drying Techniques to Prevent Damage and Corrosion
When rinsing your engine, avoid using high-pressure water directly on sensitive components such as electrical connectors, sensors, and air intakes. A gentle flow of water paired with mild soap is ideal for washing away residues without forcing moisture into places that can cause corrosion. Always opt for filtered or distilled water if possible, as mineral deposits from hard water can leave harmful deposits and accelerate rust formation over time. Focus on thorough but cautious rinsing to remove soap and dirt without soaking the engine unnecessarily.
Drying is equally crucial to maintaining your engine’s longevity. After rinsing, start by shaking off excess water and use a microfiber cloth to absorb remaining moisture from all visible surfaces. For hard-to-reach crevices, compressed air or a leaf blower at low power helps wick away trapped water. Avoid prolonged exposure to direct sunlight for drying, as rapid drying can cause thermal shock to metal parts. Consider the following techniques to ensure optimal drying:
- Cloth drying: Use lint-free, absorbent microfiber towels
- Air drying: Use compressed air to remove water in tight spaces
- Low heat drying: Utilize a heat gun on low setting or engine heat if safe
| Technique | Best For | Notes |
|---|---|---|
| Microfiber Towel | Surface drying | Soft, absorbent, reusable |
| Compressed Air | Crevices and connectors | Use low pressure |
| Heat Gun (Low) | Stubborn moisture | Keep distance to avoid damage |

Post-Cleaning Maintenance Tips for Long-Lasting Engine Performance
To maintain optimal engine performance after cleaning, it’s crucial to adopt a routine that protects your efforts and extends the life of your engine. Start by regularly checking for any residual moisture in hidden engine crevices; water left behind can lead to corrosion over time. Use a microfiber cloth or compressed air to gently dry areas prone to retaining moisture. Additionally, apply a high-quality engine protectant spray to shield metal components from rust and grime buildup, creating a barrier that repels dirt and reduces oxidation.
Implementing simple habits such as:
- Inspecting belts and hoses for wear and tear immediately after cleaning
- Ensuring all caps and covers are properly sealed to prevent contaminants from entering
- Following manufacturer-recommended intervals for oil and fluid changes
- Keeping the engine bay free of debris like leaves and dirt with periodic quick sweeps
can dramatically improve engine longevity. For a quick visual guide, consider the table below showing common areas that require attention post-cleaning and their maintenance tips.
| Engine Area | Post-Cleaning Care |
|---|---|
| Battery Terminals | Apply dielectric grease to prevent corrosion |
| Spark Plugs | Check connections and dry thoroughly |
| Air Filter Housing | Ensure proper sealing to avoid dirt ingress |
| Alternator | Inspect for dirt, avoid direct water spraying |
Q&A
Q&A: How to Clean Your Engine Properly
Q1: Why should I clean my engine?
A1: A clean engine isn’t just about aesthetics—it helps improve performance, prevents corrosion, and allows for easier detection of leaks or damages. Plus, it can extend your engine’s lifespan by keeping grime and buildup at bay.
Q2: When is the best time to clean my engine?
A2: Ideally, clean your engine when it’s cool—never immediately after driving. Waiting a few hours prevents burns and avoids thermal shock that could damage engine components.
Q3: What tools and materials do I need?
A3: Gather these essentials: degreaser or engine cleaner, plastic bags or wrap, a soft brush, a hose or pressure washer (with low pressure), microfiber cloths, and safety gloves. Choosing the right cleaner is important to avoid harsh chemicals that could harm engine parts.
Q4: How do I prepare the engine before cleaning?
A4: First, disconnect the battery for safety. Cover sensitive electrical parts like the alternator, exposed wires, and air intake with plastic bags to protect them from water. Remove loose debris by hand or with compressed air.
Q5: What’s the best way to apply cleaner?
A5: Spray the degreaser evenly across the engine bay, focusing on areas with heavy grease or dirt buildup. Let it sit for 5-10 minutes to break down grime—but don’t let it dry completely.
Q6: How do I rinse the engine without causing damage?
A6: Use a gentle spray of water to rinse off the cleaner. Avoid high-pressure water that can force moisture into electrical components. A garden hose with a spray nozzle or a low-pressure washer works best.
Q7: What comes after rinsing?
A7: Dry the engine thoroughly using microfiber towels or compressed air. Remove the coverings from electrical parts once everything is dry. Let the engine air out for a bit before reconnecting the battery.
Q8: Are there any do’s and don’ts?
A8: Do wear gloves and protective eyewear. Do test any cleaner on a small area first. Don’t ignore manufacturer instructions or neglect the protection of sensitive parts. Avoid using harsh chemicals or excessive water pressure.
Q9: How often should I clean my engine?
A9: For most vehicles, an engine cleaning every 6-12 months is sufficient. However, if you frequently drive in dusty, muddy, or oily conditions, more frequent cleanings may be beneficial.
Q10: Can I clean my engine myself or should I hire a professional?
A10: DIY engine cleaning is entirely doable with proper care and knowledge. However, if you’re unsure or have a complex engine setup, hiring a professional ensures the job is done safely and effectively.
By following these steps, your engine will run cleaner, cooler, and more efficiently—helping your vehicle perform at its best for years to come.
Key Takeaways
Cleaning your engine properly is more than just a routine chore—it’s a way to preserve the heartbeat of your vehicle and keep it running smoothly for miles to come. With the right tools, a bit of patience, and careful attention to detail, you can transform a grimy engine bay into a gleaming showcase of mechanical pride. Remember, a clean engine isn’t just about aesthetics; it’s about performance, safety, and longevity. So roll up your sleeves, follow the steps, and give your engine the care it deserves—because every journey begins with a well-maintained heart under the hood.