

There’s a special kind of satisfaction that comes from rolling up your sleeves and taking care of your car on your own. Changing your car’s oil at home is not just a way to save money—it’s an invitation to connect more deeply with the machine that carries you through life’s journeys. Whether you’re a seasoned gearhead or a curious beginner, mastering this essential skill empowers you to ensure your vehicle runs smoothly and reliably. In this guide, we’ll walk you through the straightforward steps of changing your car oil at home, transforming what might seem like a daunting task into a manageable and rewarding experience.
Table of Contents
- Gathering Essential Tools and Materials Before You Begin
- Choosing the Right Oil and Filter for Your Vehicle
- Preparing Your Car and Safety Tips for the Oil Change
- Step-by-Step Guide to Draining the Old Oil Properly
- Replacing the Oil Filter and Adding New Oil with Precision
- Disposing of Used Oil Responsibly and Final Inspection Tips
- Q&A
- Wrapping Up
Gathering Essential Tools and Materials Before You Begin
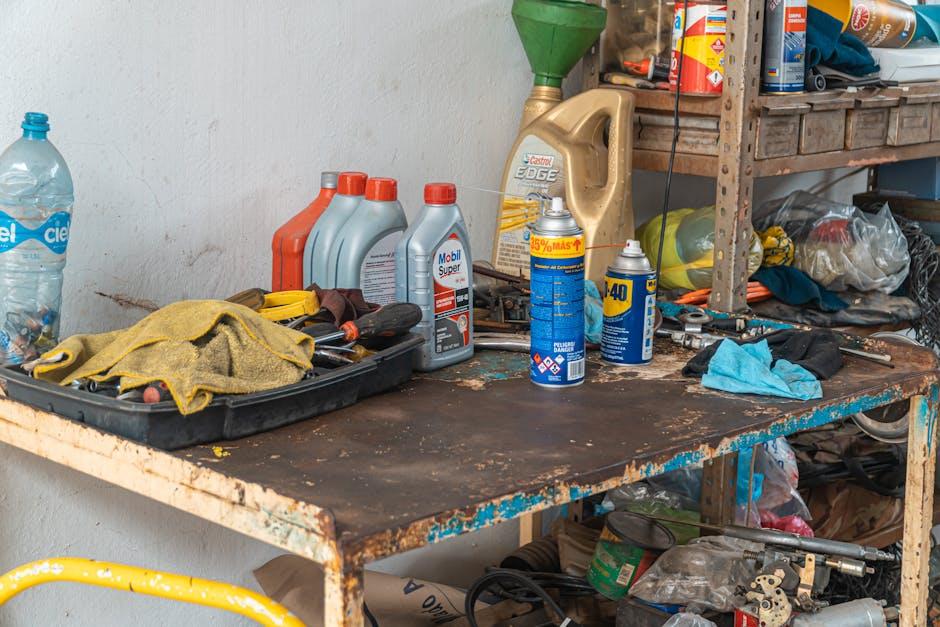
Before you dive into changing your car’s oil, it’s crucial to arm yourself with the right tools and materials. Having everything ready not only streamlines the process but also helps avoid unnecessary frustration or trips to the store mid-job. Essentials include a quality motor oil that matches your vehicle’s specifications, a new oil filter, and a drain pan to catch the old oil. Don’t forget a wrench set or an oil filter wrench to safely remove the drain plug and oil filter, as well as some rags for any inevitable spills.
Beyond the basics, consider safety and convenience items as part of your toolkit. Gloves protect your hands from hot oil and grime, while a funnel makes refilling oil less messy. Additionally, a jack and jack stands or ramps can elevate your car to provide easier access underneath. To keep things organized, here’s a simple rundown of what you’ll need:
- Correct grade of motor oil
- New oil filter
- Drain pan
- Wrench set and oil filter wrench
- Gloves and rags
- Funnel
- Jack and jack stands or ramps
| Tool/Material | Purpose |
|---|---|
| Motor Oil | Lubricates engine parts |
| Oil Filter | Filters contaminants from oil |
| Drain Pan | Collects used oil |
| Wrench Set | Removes drain plug and filter |
| Funnel | Helps pour oil without spills |

Choosing the Right Oil and Filter for Your Vehicle
Picking the correct oil for your vehicle is crucial to maintain engine health and performance. The first step is to consult your car’s owner manual, which specifies the recommended oil type and viscosity. Whether you choose synthetic, semi-synthetic, or conventional oil can significantly impact your engine’s efficiency and lifespan. Synthetic oils, for example, tend to perform better under extreme temperatures and offer longer protection intervals. Also, consider your driving conditions: frequent stop-and-go city driving or harsh climates might demand oil with specific properties.
Equally important is selecting the right oil filter, which traps contaminants and prevents engine wear. Filters differ by size, material, and filtration efficiency, so matching the correct one with your car model is essential. When buying a filter, look for brands that meet industry standards like the API (American Petroleum Institute) certification. Below is a simple guide to help compare key oil types and filter features commonly used by car enthusiasts:
| Type | Viscosity | Best Use | Typical Lifespan |
|---|---|---|---|
| Synthetic | 0W-20, 5W-30 | High performance, extreme temperatures | 7,500-10,000 miles |
| Semi-Synthetic | 5W-20, 10W-30 | Moderate climates, mixed driving | 5,000-7,500 miles |
| Conventional | 10W-30, 15W-40 | Regular driving, older engines | 3,000-5,000 miles |

Preparing Your Car and Safety Tips for the Oil Change
Before you start draining the old oil, it’s crucial to get your vehicle ready for the task ahead. Park your car on a flat, level surface and engage the parking brake to ensure stability. For safety and better access, elevate the car using sturdy jack stands rather than relying solely on a hydraulic jack. Wearing mechanic gloves will protect your hands from hot oil and sharp edges, while safety goggles guard your eyes from unexpected splashes. Have a container ready to catch the used oil, and lay down absorbent mats or newspapers to keep the workspace clean.
When it comes to safety, attention to detail can prevent accidents. Here are some quick tips to keep in mind:
- Work on a cooled engine—hot oil can cause serious burns.
- Use the correct size wrench to avoid stripping the oil drain plug.
- Double-check that the jack stands are secure before sliding under the car.
- Dispose of used oil responsibly—many auto shops offer recycling programs.
| Preparation Item | Purpose |
|---|---|
| Flat Surface | Ensures car stability |
| Jack Stands | Safe elevation |
| Gloves & Goggles | Personal protection |
| Oil Catch Pan | Prevents spills |
Step-by-Step Guide to Draining the Old Oil Properly
Begin by parking your car on a flat surface and engaging the parking brake to ensure safety. Slide under the vehicle with a sturdy drain pan positioned directly beneath the oil drain plug. Using the correct size wrench, carefully loosen the plug by turning it counterclockwise. Be prepared for a rush of warm oil to spill out as soon as the plug is removed, so keep your hands and face clear to avoid burns. Let the oil drain fully, which may take several minutes — this ensures all the old, dirty oil exits your engine, making way for fresh lubricant.
- Wear gloves to protect your hands from hot oil and contaminants.
- Use a funnel when refilling to avoid any spills later on.
- Inspect the drain plug washer for damage and replace if necessary.
- Dispose of the used oil responsibly at a recycling center or auto shop.
| Tool | Purpose | Tip |
|---|---|---|
| Socket Wrench | Loosening drain plug | Use correct size to avoid stripping |
| Drain Pan | Collecting old oil safely | Choose wide and shallow for stability |
| Gloves | Hand protection | Heat-resistant type preferred |
Replacing the Oil Filter and Adding New Oil with Precision
Before installing the new oil filter, it’s essential to prepare it properly to ensure a perfect seal and prevent leaks. Begin by applying a thin layer of fresh oil on the rubber gasket of the new filter using your finger or a small brush. This simple step lubricates the gasket, helping it seat tightly against the engine’s surface. When screwing the filter into place, turn it clockwise by hand until the gasket contacts the mounting surface, then tighten it another three-quarters to one full turn. Avoid using a wrench to overtighten, as this can damage the filter or its seal.
When it’s time to refill your engine with new oil, precision is key. Refer to your vehicle’s owner manual for the exact oil type and capacity. Use a clean funnel to pour the oil slowly into the fill hole, minimizing spillage. Pouring in increments and periodically checking the dipstick ensures you don’t overfill. Remember, topping up with the right oil grade not only enhances engine performance but also prolongs its life. Once done, secure the oil cap tightly and start the engine for a minute to circulate the new oil, then check the dipstick one final time.
- Prep Tip: Lubricate the filter’s gasket with new oil before installation.
- Tightening: Hand-tight plus ¾ to 1 full turn is enough.
- Oil Type: Always match your manufacturer’s recommended grade.
- Fill Slowly: Introducing oil in stages avoids overfilling.
- Double Check: Monitor oil levels via dipstick before and after refilling.
| Step | Action | Tip |
|---|---|---|
| 1 | Apply oil to filter gasket | Prevents leaks and eases installation |
| 2 | Hand-tighten oil filter | Avoid overtightening with tools |
| 3 | Slowly pour new oil | Check dipstick incrementally |
| 4 | Start engine and re-check oil | Ensures proper circulation and level |

Disposing of Used Oil Responsibly and Final Inspection Tips
Once you’ve drained the old oil, it’s crucial to handle it with care—this fluid contains contaminants that can harm the environment if disposed of incorrectly. Never pour used oil down drains, on the ground, or into waterways. Instead, collect the oil in a clean, leak-proof container with a secure lid. Many auto parts stores, service stations, and recycling centers accept used oil for safe recycling. By recycling, you help conserve natural resources and prevent soil and water pollution. Remember, a little effort in disposal goes a long way in protecting our planet.
Before wrapping up your oil change, a thorough final inspection can save you from future headaches. Double-check that the drain plug is tightly secured and that the new oil filter is installed correctly with no leaks. Review your oil level using the dipstick to ensure it’s within the recommended range—too much or too little oil can cause engine problems. Don’t forget to wipe off any spilled oil around the fill cap or engine bay to keep things tidy and reduce the risk of smoke or odors. Keep a close eye during the first few minutes of engine idle; if you notice any leaks, shut off the engine and address the problem immediately.
Q&A
Q: Why should I change my car oil at home?
A: Changing your own car oil saves money, gives you hands-on knowledge about your vehicle, and ensures that the job is done just the way you like it—plus, it’s a satisfying DIY achievement.
Q: How often should I change my car oil?
A: Most vehicles recommend an oil change every 3,000 to 5,000 miles, but always check your owner’s manual. Newer synthetic oils might last longer, so tailor your schedule accordingly.
Q: What tools and materials do I need to change my car oil?
A: You’ll need fresh oil, a new oil filter, a wrench or socket set, an oil filter wrench, a drain pan, a funnel, gloves, and some rags. Optional but helpful: ramps or jack stands for better workspace and a flashlight.
Q: How do I prepare my car before changing the oil?
A: Warm up the engine by running it for a few minutes; warm oil drains easier. Park your car on a flat surface, engage the parking brake, and if necessary, lift the front end safely using ramps or jack stands.
Q: What’s the step-by-step process to change car oil at home?
A: First, remove the oil filler cap inside the engine to vent the system. Next, slide the drain pan under the oil drain plug, then carefully remove the plug to let the oil flow out. Remove the old oil filter with the wrench, apply a little fresh oil to the new filter’s seal, and install it by hand. Once drained, reinstall the drain plug, add fresh oil through the filler hole using a funnel, then replace the filler cap.
Q: How do I dispose of used oil safely?
A: Never pour used oil down drains or on the ground. Collect it in a sealed container and take it to a recycling center, auto parts store, or hazardous waste facility that accepts used motor oil.
Q: What common mistakes should I avoid?
A: Don’t overtighten the drain plug or oil filter, which can cause damage. Avoid mixing different types of oil and always double-check you’ve replaced the drain plug and filter correctly. Also, never skip checking oil levels after the change.
Q: Can I reuse my old oil filter?
A: It’s best to always replace the oil filter with a new one. Old filters can harbor contaminants and reduce your engine’s protection.
Q: How do I know if I did it right?
A: After changing the oil, start your engine and look underneath for leaks. Check the oil level on the dipstick to ensure it’s within the recommended range. If all looks good, take a short test drive and recheck levels and leaks.
Q: Is changing car oil complicated for beginners?
A: With a bit of patience and preparation, anyone can change their car’s oil. Follow reliable guides, take safety precautions seriously, and you’ll find it’s not as daunting as it seems!
Wrapping Up
Changing your car’s oil at home may seem like a simple task, but it’s one that empowers you to take control of your vehicle’s health. With a little preparation, the right tools, and these clear steps in hand, you’re not just saving money—you’re gaining confidence under the hood. So next time the oil light flickers on, remember: the power to keep your engine running smoothly is literally at your fingertips. Happy wrenching!
6 Comments
0i9hcx
0i9hcx
**herpafend official**
Herpafend is a natural wellness formula developed for individuals experiencing symptoms related to the herpes simplex virus. It is designed to help reduce the intensity and frequency of flare-ups while supporting the bodys immune defenses.
**prostafense**
ProstAfense is a premium, doctor-crafted supplement formulated to maintain optimal prostate function, enhance urinary performance, and support overall male wellness.
**neurosharp**
Neuro Sharp is an advanced cognitive support formula designed to help you stay mentally sharp, focused, and confident throughout your day.
**backbiome**
Mitolyn is a carefully developed, plant-based formula created to help support metabolic efficiency and encourage healthy, lasting weight management.