

Your car’s shock absorbers are the unsung heroes of every smooth ride, quietly absorbing the bumps and jolts that the road throws your way. Over time, these vital components wear out, leading to a less comfortable drive and compromised safety. But fear not—replacing shock absorbers may sound daunting, yet with the right tools and guidance, it’s a task well within the reach of any determined DIYer. In this article, we’ll walk you through the essential steps to confidently swap out your car’s shocks, ensuring your journey remains steady, safe, and enjoyable.
Table of Contents
- Choosing the Right Shock Absorbers for Your Vehicle
- Preparing Your Workspace and Gathering Essential Tools
- Step-by-Step Guide to Safely Removing Old Shock Absorbers
- Inspecting Suspension Components Before Installation
- Installing New Shock Absorbers with Precision and Care
- Testing and Adjusting for Optimal Ride Comfort and Safety
- Q&A
- Wrapping Up
Choosing the Right Shock Absorbers for Your Vehicle
Selecting the perfect shock absorbers for your car involves understanding the specific demands of your driving style and vehicle type. Consider the following points to ensure you make an informed choice:
- Vehicle Compatibility: Match shock absorbers to your car’s make and model for optimal fit and performance.
- Driving Conditions: For rough terrains or off-road adventures, heavy-duty shocks provide durability, while standard road shocks suit everyday city driving.
- Ride Comfort vs. Handling: Some shocks prioritize a smooth ride, others enhance steering response and control—choose based on your preference.
- Quality and Brand Reputation: Investing in well-known brands often guarantees longer-lasting and reliable absorbers.
To simplify your decision-making, the table below compares common shock absorber types by key features:
| Type | Best For | Advantages | Considerations |
|---|---|---|---|
| Hydraulic | Standard commuting | Affordable, smooth ride | Wear out faster on rough roads |
| Gas-Charged | Sporty driving | Improved control, reduced fade | Slightly firmer ride |
| Adjustable | Custom driving needs | Flexibility in ride stiffness | Higher cost, complex installation |
| Air Shocks | Heavy loads & towing | Adjustable load support | Maintenance-intensive |
Preparing Your Workspace and Gathering Essential Tools
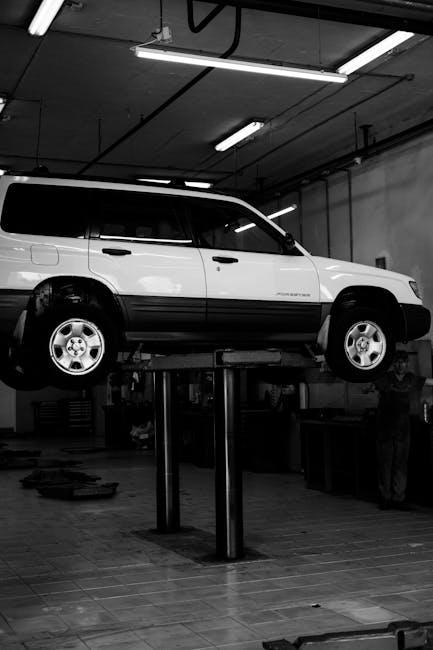
Creating a safe and organized environment is the first step toward a successful shock absorber replacement. Begin by selecting a flat, well-lit area—preferably a garage or driveway—that offers ample space to maneuver around your vehicle without obstruction. Clear the workspace of any clutter and lay down protective mats or cardboard to catch grease and debris, ensuring your tools and parts stay clean. This proactive setup not only saves time but also helps prevent accidents or misplaced components.
Gathering the right tools before you start is crucial to maintaining workflow and efficiency. Equip yourself with the essentials listed below, all checked for functionality and cleanliness:
- Jack and jack stands: for securely lifting and supporting the vehicle.
- Socket set and wrenches: various sizes to fit bolts and nuts.
- Pliers and screwdrivers: for removing clips and small fasteners.
- Torque wrench: to tighten bolts to manufacturer specifications.
- Penetrating oil: helpful for loosening rusted or tight bolts.
- Safety gear: gloves and safety glasses to protect your hands and eyes.
| Tool | Purpose | Tip |
|---|---|---|
| Jack Stands | Support vehicle securely | Always double-check stability |
| Torque Wrench | Ensure proper bolt tension | Use recommended torque settings |
| Penetrating Oil | Loosen stubborn bolts | Apply and wait 10 minutes |
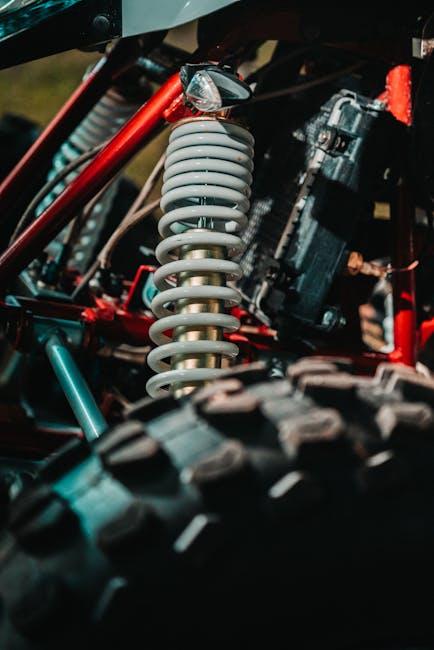
Step-by-Step Guide to Safely Removing Old Shock Absorbers
Begin by securely parking your car on a flat surface and engaging the parking brake. Use a hydraulic jack to lift the vehicle and place sturdy jack stands beneath the frame to ensure stability throughout the process. Never rely solely on the jack to support your car, as safety is paramount when working under a vehicle. Before loosening any bolts, apply penetrating oil to the shock absorber mounts to ease removal and reduce the risk of damage.
Once the car is safely elevated, locate the old shock absorbers. Carefully remove the bolts securing the top and bottom mounts using a wrench or socket set. Keep a firm grip on the shock absorber while loosening bolts to prevent sudden drops. In some cases, compressing the shock absorber spring with a spring compressor tool makes the removal easier and prevents injury. Below is a quick checklist to keep handy:
- Secure vehicle on jack stands
- Apply penetrating oil to mounts
- Use proper tools for bolts
- Wear safety glasses and gloves
- Utilize spring compressor if needed
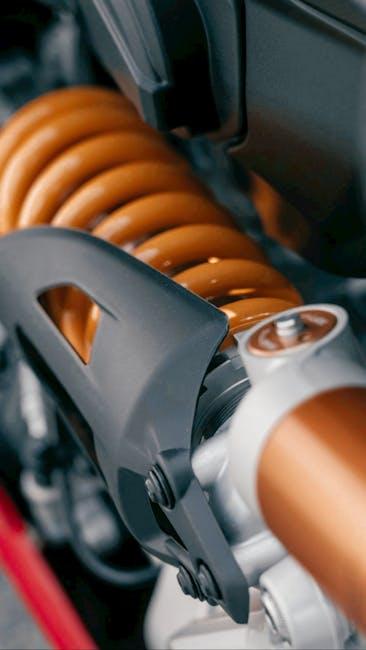
Inspecting Suspension Components Before Installation
Before fitting new shock absorbers, a detailed examination of all suspension components is crucial to ensure a seamless installation and optimal performance. Start by visually inspecting the bushings, mounts, and control arms for signs of wear, corrosion, or damage. Even minor cracks or tears in rubber parts can significantly affect shock absorber functionality, leading to premature failure or compromised ride quality. Also, verify that all bolts and nuts are intact and free from rust, as these fasteners are vital for securing suspension elements safely.
Utilize the checklist below to streamline your inspection process and ensure no critical parts are overlooked:
- Shock absorber mounts: Check for looseness or cracking.
- Control arms: Look for bends, rust, or fatigue.
- Ball joints and tie rods: Assess for play or damage.
- Springs: Ensure no breaks or severe corrosion exist.
- Fasteners: Confirm all hardware is present and in good condition.
| Component | What to Look For | Why It Matters |
|---|---|---|
| Shock Mounts | Cracks, wear, looseness | Prevents noise and incorrect shock position |
| Bushings | Tears, hardness, deformation | Provides cushioning and reduces vibration |
| Control Arms | Bends, rust, fatigue | Ensures proper wheel alignment and suspension geometry |
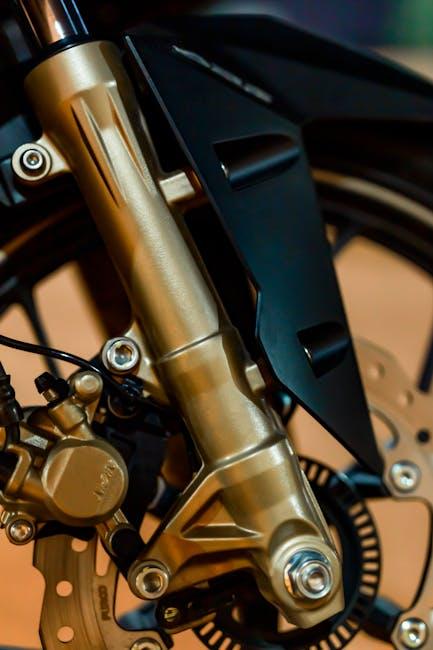
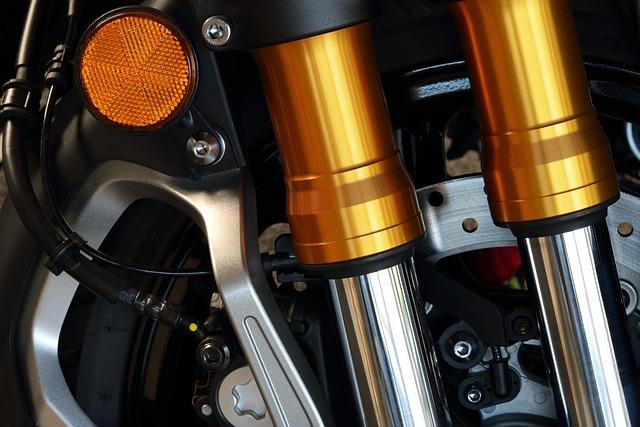
Installing New Shock Absorbers with Precision and Care
Before fitting the new shock absorbers, ensure the mounting surfaces are clean and free from rust or debris. This prevents premature wear and guarantees a snug fit. When positioning the shock absorber, align it precisely with the original mounting points to avoid stress on the suspension components. Take advantage of high-quality, anti-seize lubricant on the bolts to facilitate easier removal during future maintenance. Remember, overtightening can damage both the new shock and surrounding parts, so always adhere to the manufacturer’s recommended torque settings.
- Inspect bushings and mounts for signs of wear before installation.
- Use a torque wrench to tighten bolts correctly.
- Replace hardware like bolts and nuts if they show any deformation or corrosion.
| Step | Action | Tip |
|---|---|---|
| 1 | Clean mounting surfaces | Use a wire brush and solvent |
| 2 | Align shock absorber | Match original bolt holes exactly |
| 3 | Apply anti-seize lubricant | Prevents rust and eases future removal |
| 4 | Tighten bolts | Follow torque specifications strictly |
Testing and Adjusting for Optimal Ride Comfort and Safety
Once your new shock absorbers are installed, it’s crucial to evaluate how they interact with your vehicle to ensure a smooth and secure driving experience. Begin with a slow test drive on various road surfaces—smooth asphalt, gravel, and pothole-ridden streets—to feel the immediate impact of the new shocks. Pay close attention to vibrations, bouncing, or any unusual noises. These subtle cues indicate how well your suspension is absorbing shocks and maintaining tire contact with the road.
Fine-tuning your ride may involve adjusting the preload or replacing worn bushings and mounts to optimize both comfort and handling. Here’s a quick checklist to help guide your assessment:
- Verify even tire wear patterns
- Check for excessive body roll around corners
- Monitor vehicle stability during braking
- Listen for knocking or rattling sounds
| Test Condition | Ideal Response |
|---|---|
| Driving over speed bumps | Minimal jolt, quick stabilization |
| Sudden braking | Controlled nose dive, no skidding |
| Taking sharp turns | Reduced body lean, steady grip |
Adjustments made now will maximize your shock absorbers’ lifespan and enhance ride safety, giving you confidence whether cruising city streets or tackling rugged terrains.
Q&A
Q&A: How to Replace Car Shock Absorbers
Q1: What exactly do shock absorbers do in a car?
A1: Shock absorbers act like the car’s muscles for smoothness. They control the bounce and sway by dampening the impact from bumps and uneven roads, ensuring your ride stays steady and your tires keep a good grip.
Q2: How can I tell if my shock absorbers need replacing?
A2: Signs include excessive bouncing after hitting a bump, nose-diving during braking, uneven tire wear, leaking fluid around the shocks, or a generally rough and unstable ride. If your car feels like it’s riding a trampoline, it’s time to check those shocks.
Q3: Do I need special tools to replace shock absorbers?
A3: The basics include a jack and jack stands, a wrench set, a socket set, and sometimes a spring compressor, depending on your car’s suspension design. Having the right tools makes the job safer and smoother, but some projects may need extra specialty tools.
Q4: Is it necessary to replace shock absorbers in pairs?
A4: Absolutely! Replacing both shocks on the same axle (front or rear) ensures balanced handling and consistent performance. Mixing old and new shocks can cause uneven wear and unstable rides.
Q5: How long does it typically take to replace shock absorbers?
A5: For a DIY enthusiast, expect about 1 to 3 hours for a pair, depending on your vehicle and experience level. Professional mechanics can usually do it faster, often within an hour.
Q6: Are all shock absorbers the same, or does it matter which ones I buy?
A6: Shock absorbers come in various types—standard hydraulic, gas-charged, adjustable, or heavy-duty. Choose based on your vehicle type, driving style, and terrain. Quality matters, so pick reputable brands suited for your car’s specs.
Q7: Can I replace shocks without affecting my car’s alignment?
A7: Generally, air shocks replacement doesn’t require a realignment. However, if your shocks are part of a strut assembly that affects wheel alignment, it’s wise to get an alignment check afterward to maintain optimal handling.
Q8: What safety precautions should I take?
A8: Always securely lift and support your car with jack stands—never rely solely on a jack. Wear gloves and eye protection, and follow your vehicle’s service manual carefully. Taking your time beats rushing and risking injury.
Q9: After replacing shock absorbers, is there any special break-in period?
A9: Most shocks are ready to perform immediately, but new shocks may feel a bit stiff at first. Drive gently for a few hundred miles to allow components to settle and ensure the best ride quality.
Q10: When in doubt, should I attempt this job myself or seek a professional?
A10: If you’re comfortable with basic car repairs, have the right tools, and access to detailed instructions or a manual, this can be a rewarding DIY task. Otherwise, professional installation guarantees expertise and peace of mind.
Wrapping Up
Replacing your car’s shock absorbers might seem like a daunting task at first, but with the right tools, a bit of patience, and clear instructions, it becomes a manageable and rewarding DIY project. By mastering this essential maintenance skill, you’re not just restoring comfort and control to your ride—you’re also deepening your connection to the machine beneath you. So the next time your journey feels a little less smooth, remember that you have the power to bring back that steady, confident drive. Safe travels and happy wrenching!
354 Comments
x26b73
x26b73
z4pzyi
f3rqsg
zj52vx
0ui6qo
ltfdyq
li7mtt
irfgup
jofomw
m6dqa6
https://t.me/Online_1_xbet/3519
https://t.me/Online_1_xbet/3587
https://t.me/Official_1xbet_1xbet/s/956
https://t.me/Official_1xbet_1xbet/s/594
https://t.me/Official_1xbet_1xbet/s/1195
https://t.me/Official_1xbet_1xbet/s/444
https://t.me/Official_1xbet_1xbet/s/1329
https://t.me/Official_1xbet_1xbet/s/914
https://t.me/s/Official_1xbet_1xbet/1854
https://t.me/s/Official_1xbet_1xbet/1820
https://t.me/s/Official_1xbet_1xbet/1853
https://t.me/s/Official_1xbet_1xbet/1705
https://t.me/s/Official_1xbet_1xbet/1612
https://t.me/s/Official_1xbet_1xbet/1648
https://t.me/Official_1xbet_1xbet/1677
https://t.me/Official_1xbet_1xbet/1812
https://t.me/s/Official_1xbet_1xbet/1839
https://t.me/Official_1xbet_1xbet/1728
https://t.me/Official_1xbet_1xbet/1700
https://t.me/s/Official_1xbet_1xbet/1706
https://t.me/Official_1xbet_1xbet/1811
https://t.me/Official_1xbet_1xbet/1820
https://t.me/Official_1xbet_1xbet/1662
https://t.me/Official_1xbet_1xbet/1832
https://t.me/Official_1xbet_1xbet/1714
https://t.me/Official_1xbet_1xbet/1835
https://t.me/s/Official_1xbet_1xbet/1744
https://t.me/s/topslotov
m13vsh
https://t.me/s/official_1win_aviator
https://t.me/s/reiting_top10_casino/2
https://t.me/reiting_top10_casino/2
https://t.me/reiting_top10_casino/5
https://t.me/reiting_top10_casino/10
https://t.me/reiting_top10_casino
https://t.me/reiting_top10_casino/9
https://t.me/reiting_top10_casino/6
https://t.me/s/reiting_top10_casino/5
https://t.me/s/reiting_top10_casino/7
https://t.me/reiting_top10_casino/3
https://t.me/s/reiting_top10_casino/8
https://t.me/reiting_top10_casino/7
https://t.me/s/reiting_top10_casino/9
https://t.me/s/Gaming_1xbet
https://t.me/s/PlayCasino_1win
https://t.me/s/PlayCasino_1xbet
https://t.me/s/PlayCasino_1xbet
https://t.me/s/PlayCasino_1win
https://t.me/s/ofitsialniy_1win/33/evith
https://t.me/s/iw_1xbet
https://t.me/s/ofitsialniy_1win
https://t.me/s/Official_beefcasino
0akwhw
https://t.me/s/bs_1xbet/46
https://t.me/s/bs_1xbet/37
https://t.me/bs_1xbet/31
https://t.me/bs_1xbet/34
https://t.me/s/bs_1xbet/16
https://t.me/s/bs_1xbet/15
https://t.me/bs_1xbet/23
https://t.me/bs_1xbet/28
https://t.me/s/bs_1xbet/34
https://t.me/bs_1xbet/46
https://t.me/s/bs_1xbet/24
https://t.me/bs_1xbet/12
https://t.me/bs_1xbet/17
https://t.me/s/bs_1xbet/9
https://t.me/s/bs_1xbet/26
https://t.me/bs_1xbet/51
https://t.me/bs_1xbet/39
https://t.me/bs_1xbet/2
https://t.me/s/bs_1xbet/35
https://t.me/s/bs_1xbet/16
https://t.me/s/bs_1xbet/6
https://t.me/jw_1xbet/413
https://t.me/s/jw_1xbet/903
https://t.me/jw_1xbet/786
https://t.me/s/jw_1xbet/618
https://t.me/s/jw_1xbet/231
https://t.me/s/bs_1Win/367
https://t.me/bs_1Win/1202
https://t.me/s/bs_1Win/659
https://t.me/s/bs_1Win/940
https://t.me/s/bs_1Win/668
https://t.me/bs_1Win/577
https://t.me/s/bs_1Win/732
https://t.me/s/bs_1Win/492
https://t.me/s/bs_1Win/766
https://t.me/bs_1Win/854
https://t.me/bs_1Win/1170
https://t.me/bs_1Win/607
https://t.me/s/Official_mellstroy_casino/10
https://t.me/s/Official_mellstroy_casino/51
https://t.me/Beefcasino_rus/39
https://t.me/Official_mellstroy_casino/57
https://t.me/Official_mellstroy_casino/39
https://t.me/s/Official_mellstroy_casino/55
https://t.me/Official_mellstroy_casino/8
https://t.me/Official_mellstroy_casino/58
https://t.me/Official_mellstroy_casino/14
https://t.me/s/Official_mellstroy_casino/30
https://t.me/s/Official_mellstroy_casino/39
https://t.me/s/Official_mellstroy_casino/37
https://t.me/Official_mellstroy_casino/11
https://t.me/s/Best_promocode_rus/1627
https://t.me/Best_promocode_rus/2662
https://t.me/Beefcasino_rus/57
https://t.me/s/ud_Vodka/46
https://t.me/s/ud_Vulkan/46
https://t.me/s/ud_Stake/62
https://t.me/s/ud_Jet/53
https://t.me/ud_Flagman/58
https://t.me/s/ud_Jet/64
https://t.me/s/ud_MrBit/46
https://t.me/?ud_1Go/62
https://t.me/s/ud_Jet/50
https://t.me/ud_DragonMoney/62
https://t.me/s/ud_Lex/44
https://t.me/s/ud_Gizbo/51
https://t.me/ud_JoyCasino/47
https://t.me/s/ud_Vulkan/56
https://t.me/ud_Pin_Up/45
https://t.me/s/ud_Rox/54
https://t.me/s/Beefcasino_rus/59
https://t.me/s/ud_MrBit/57
https://t.me/s/ud_Vulkan/49
https://t.me/s/ud_Kometa/49
https://t.me/ud_Pinco/61
https://t.me/s/ud_Casino_X/47
https://t.me/s/ud_Drip/51
https://t.me/ud_Flagman/60
https://t.me/ud_Irwin/46
https://t.me/ud_Pokerdom/53
https://t.me/ud_Lex/61
https://t.me/ud_PlayFortuna/10
https://t.me/s/ud_Stake/18
https://t.me/s/ud_Riobet/29
https://t.me/s/Ud_GiZbo
https://t.me/s/uD_CASinO_X
https://t.me/s/uD_dRagonMOneY
https://t.me/s/ud_voDkA
https://t.me/s/UD_KOmEtA
https://t.me/s/Ud_MRbiT
https://t.me/s/Ud_FlagMAN
https://t.me/s/ud_1Go
https://t.me/s/official_1win_aviator/38
https://t.me/s/Ud_rIoBet
https://t.me/s/ud_poKERdoM
https://t.me/s/official_1win_aviator/54
https://t.me/s/uD_daddy
https://t.me/s/UD_drIp
https://t.me/s/uD_stArda
https://t.me/s/UD_PlAYfoRtuNA
https://t.me/s/ud_1XsLOtS
https://t.me/s/ud_StaKe
https://t.me/s/tf_1win
https://t.me/s/kfo_1win
https://t.me/s/kfo_1win
https://t.me/s/tf_1win
https://t.me/s/kta_1win
https://t.me/s/ud_PLAYfortunA
https://t.me/s/official_1win_aviator/275
https://t.me/s/uD_StAkE
https://t.me/s/UD_DriP
https://t.me/s/ud_gIZbo
https://t.me/s/ud_keNT
https://t.me/s/UD_DADdy
https://t.me/s/uD_KomEtA
https://t.me/s/Ud_joYCASino
https://t.me/s/ke_GGBet
https://t.me/s/ke_Volna
https://t.me/s/ke_1Go
https://t.me/official_1win_aviator/188
https://t.me/s/ke_Riobet
https://t.me/s/ke_Drip
https://t.me/s/ke_Legzo
https://t.me/s/ke_Monro
https://t.me/s/ke_Izzi
https://t.me/s/ke_Pokerdom
https://t.me/s/kef_R7
https://t.me/s/ke_Irwin
https://t.me/s/ke_Stake
https://t.me/s/ke_1Win
https://t.me/s/ke_Daddy
https://t.me/s/ke_Pin_Up
https://t.me/s/ke_kent
https://t.me/s/ke_Kometa
https://t.me/s/ke_Fresh
https://t.me/s/ke_1xSlots
https://t.me/s/ke_JoyCasino
https://t.me/s/ke_Leon
https://t.me/s/ke_Gizbo
https://t.me/s/ke_Vulkan
https://t.me/s/ke_Pinco
https://t.me/s/ke_Martin
https://t.me/s/ke_Casino_X
https://t.me/s/official_1win_aviator/138
https://t.me/s/kef_Lex
https://t.me/s/ke_PlayFortuna
https://t.me/s/ke_DragonMoney
https://t.me/s/official_1win_aviator/82
https://t.me/s/ke_Jet
https://t.me/s/ke_Flagman
https://t.me/s/ke_mellstroy
https://t.me/s/ke_MrBit
https://t.me/s/ke_1xbet
https://t.me/s/ke_Sol
https://t.me/s/ke_Booi
https://t.me/s/ke_CatCasino
https://t.me/s/ke_MostBet
https://t.me/s/ke_Gama
https://t.me/s/topcasino_v_rossii
https://t.me/s/top_kazino_z
https://t.me/s/a_Top_onlinecasino/10
https://t.me/s/a_Top_onlinecasino/20
https://t.me/a_Top_onlinecasino/11
https://t.me/a_Top_onlinecasino/9
https://t.me/a_Top_onlinecasino/10
https://t.me/s/a_Top_onlinecasino/13
https://t.me/a_Top_onlinecasino/19
https://t.me/a_Top_onlinecasino/2
https://t.me/a_Top_onlinecasino/7
https://t.me/topcasino_rus/
https://t.me/s/official_Stake_ed
https://t.me/s/official_PinUp_ed
https://t.me/s/official_Daddy_ed
https://t.me/s/official_Gizbo_es
https://t.me/s/official_Flagman_es
https://t.me/s/official_Starda_ed
https://t.me/s/official_Vulkan_ed
https://t.me/s/official_Kent_ed
https://t.me/s/official_JoyCasino_ed
https://t.me/s/official_Riobet_es
https://t.me/s/official_Stake_es
https://t.me/s/official_Sol_es
https://t.me/s/official_R7_ed
https://t.me/s/official_R7_es
https://t.me/s/official_Jet_es
https://t.me/s/official_1Go_ed
https://t.me/s/official_Volna_es
https://t.me/s/official_Pokerdom_es
https://t.me/s/official_GGBet_ed
https://t.me/s/official_Starda_es
https://t.me/s/official_Booi_es
https://t.me/s/official_Sol_ed
https://t.me/s/official_Booi_ed
https://t.me/s/official_Kent_es
https://t.me/iGaming_live/4549
https://t.me/Daddy_egs/21
https://t.me/s/Martin_egs/10
https://t.me/Kent_egs/13
https://t.me/s/PlayFortuna_egs/15
https://t.me/s/Kent_egs/10
https://t.me/Vodka_egs/20
https://t.me/R7_egs/7
https://t.me/Fresh_egs/18
https://t.me/s/Rox_egs/13
https://t.me/Kometa_egs/4
https://t.me/s/R7_egs/20
https://t.me/s/MostBet_egs/3
https://t.me/Kent_egs/22
https://t.me/s/CasinoX_egs/11
https://t.me/Starda_egs/16
https://t.me/s/Stake_egs/9
https://t.me/MrBit_egs/5
https://t.me/s/Gizbo_egs/19
https://t.me/Gama_egs/9
https://t.me/Pokerdom_egs/18
https://t.me/JoyCasino_egs/15
https://t.me/Izzi_egs/5
https://t.me/s/Martin_egs/19
https://t.me/Legzo_egs/3
https://t.me/s/va_1xbet/11
https://t.me/s/iGaming_live/4710
https://t.me/s/va_1xbet/5
https://t.me/s/va_1xbet/24
https://t.me/s/va_1xbet/4
https://t.me/va_1xbet/12
https://t.me/va_1xbet/13
https://t.me/va_1xbet/11
https://t.me/va_1xbet/9
https://t.me/s/va_1xbet/14
https://t.me/va_1xbet/5
https://t.me/s/surgut_narashchivaniye_nogtey/11
https://t.me/s/surgut_narashchivaniye_nogtey/16
https://t.me/s/surgut_narashchivaniye_nogtey/10
https://t.me/s/ah_1xbet/12
https://t.me/ah_1xbet/3
https://t.me/ah_1xbet/5
https://t.me/ah_1xbet/15
https://t.me/s/ah_1xbet/13
https://t.me/s/ah_1xbet/17
https://t.me/s/ah_1xbet/18
https://t.me/ah_1xbet/21
https://t.me/s/ah_1xbet/14
https://t.me/ah_1xbet/19
https://t.me/ah_1xbet/20
https://t.me/s/ah_1xbet/15
https://t.me/ah_1xbet/12
https://t.me/s/ah_1xbet/6
https://t.me/s/Best_rating_casino
https://t.me/reyting_topcazino/17
https://t.me/topcasino_rus/
https://t.me/a_Topcasino/4
https://t.me/top_ratingcasino/5
https://t.me/top_ratingcasino/2
https://t.me/top_ratingcasino/3
https://t.me/top_ratingcasino/10
https://t.me/a_Topcasino/10
https://t.me/top_ratingcasino/6
https://t.me/a_Topcasino/6
https://telegra.ph/Top-kazino-11-14-2
https://t.me/kazino_bez_filtrov
https://t.me/s/kazino_bez_filtrov
https://t.me/da_1xbet/3
https://t.me/da_1xbet/9
https://t.me/da_1xbet/15
https://t.me/da_1xbet/4
https://t.me/da_1xbet/6
https://t.me/da_1xbet/10
https://t.me/da_1xbet/11
https://t.me/da_1xbet/14
https://t.me/da_1xbet/5
https://t.me/da_1xbet/8
https://t.me/da_1xbet/13
https://t.me/rq_1xbet/1041
https://t.me/rq_1xbet/587
https://t.me/rq_1xbet/1244
https://t.me/s/rq_1xbet/651
https://t.me/s/rq_1xbet/1545
https://t.me/s/rq_1xbet/995
https://t.me/s/reyting_topcazino/23
https://t.me/s/rq_1xbet/1124
https://t.me/s/rq_1xbet/801
https://t.me/Official_1xbet1/1431
https://t.me/Official_1xbet1/1057
https://t.me/Official_1xbet1/715
https://t.me/s/Official_1xbet1/268
https://t.me/Official_1xbet1/144
https://t.me/Official_1xbet1/152
https://t.me/s/Official_1xbet1/936
https://t.me/s/Official_1xbet1/73
Your article helped me a lot, is there any more related content? Thanks!