

When it comes to vehicle maintenance, few tasks inspire as much hesitation as brake pad replacement. Yet, with the right guidance and a bit of confidence, changing your brake pads yourself can be a straightforward and rewarding experience. This DIY Brake Pad Replacement Guide aims to demystify the process, offering clear, step-by-step instructions to help you maintain a crucial safety feature of your car. Whether you’re a seasoned gearhead or a curious novice, this guide will empower you to take control of your vehicle’s braking performance—saving you time, money, and the uncertainty of unexpected trips to the mechanic.
Table of Contents
- Understanding the Anatomy of Your Brake System
- Choosing the Right Brake Pads for Your Vehicle
- Essential Tools and Safety Precautions for the Job
- Step-by-Step Brake Pad Removal and Installation
- Tips for Inspecting and Maintaining Your Brake Rotors
- Test Driving and Final Checks for Optimal Performance
- Q&A
- Future Outlook
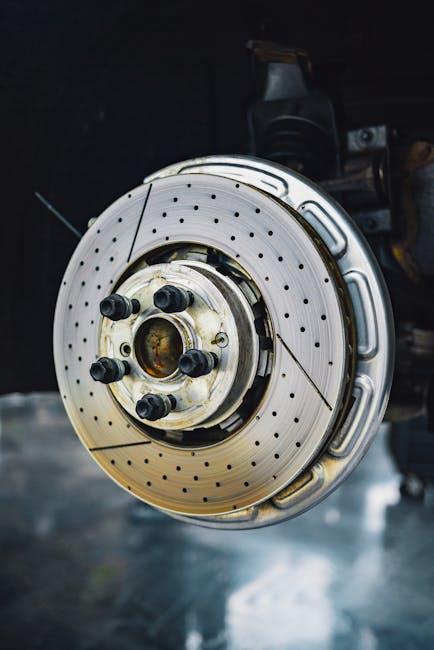
Understanding the Anatomy of Your Brake System
At the heart of every vehicle’s stopping power lies a complex interplay of components working in harmony to ensure safety and control. The brake system primarily consists of brake pads, rotors, calipers, brake lines, and the master cylinder. When you press the brake pedal, hydraulic pressure travels through the brake lines, activating the calipers to press the brake pads firmly against the rotors. This friction slows down your wheels, bringing your vehicle to a smooth stop. Understanding these components helps not only in diagnosing brake issues but also empowers you to confidently approach your DIY brake pad replacement.
The brake pads themselves are the most commonly replaced part and come in various materials, such as organic, semi-metallic, and ceramic — each with unique performance traits. Here’s a quick glimpse into essential brake system parts and their roles:
- Brake Pads: Create friction to slow the wheel.
- Rotors: Disc that the brake pad presses against.
- Calipers: Clamp the pads onto the rotors.
- Brake Lines: Carry hydraulic fluid to transfer force.
- Master Cylinder: Converts pedal pressure into hydraulic force.
| Component | Primary Function | DIY Tip |
|---|---|---|
| Brake Pads | Friction against rotors | Check thickness regularly |
| Rotors | Surface for pads to grip | Inspect for grooves or warping |
| Calipers | Apply pressure on pads | Ensure sliders move freely |
Choosing the Right Brake Pads for Your Vehicle
Selecting the perfect brake pads involves understanding the unique demands of your vehicle and driving style. While OEM (Original Equipment Manufacturer) parts are a safe bet for compatibility, exploring aftermarket options can offer enhanced performance or longevity. Consider factors such as material composition, noise levels, and wear characteristics. Ceramic pads, for example, excel in quiet operation and produce less brake dust, making them ideal for daily commuters. In contrast, semi-metallic brake pads are better suited for those who prioritize stopping power and durability, especially in rugged conditions or spirited driving.
Before making your choice, it helps to compare features at a glance. Use the table below to weigh the pros and cons across common brake pad types, helping you make an informed decision tailored to your vehicle’s needs.
| Brake Pad Type | Advantages | Best For | Considerations |
|---|---|---|---|
| Ceramic | Quiet, low dust | Daily driving, comfort | Higher cost |
| Semi-Metallic | Strong braking, durable | Performance, towing | Can be noisy, more dust |
| Organic | Affordable, gentle on rotors | Light vehicles, mild use | Wear out faster |
- Check vehicle manufacturer recommendations for brake pad specifications.
- Match pads to your typical driving conditions, such as city, highway, or off-road.
- Don’t overlook quality certifications, which indicate tested safety and performance.

Essential Tools and Safety Precautions for the Job
Before diving into the mechanical work, gather all the essential tools to ensure a smooth brake pad replacement process. You’ll need a sturdy jack and jack stands to securely lift and support your vehicle. A lug wrench is a must to remove the wheel bolts, while a C-clamp or brake caliper tool will help compress the caliper piston. Don’t forget a ratchet set with the appropriate socket sizes, a wire brush to clean brake components, and brake cleaner spray for those hard-to-reach spots. Having a torque wrench handy ensures you tighten bolts to manufacturer specifications, preserving safety and performance.
Safety is crucial during this job, so always wear protective gear including gloves and safety glasses to shield against brake dust and debris. Work on a flat, stable surface and never rely solely on the jack—always secure the vehicle on jack stands. Keep a fire extinguisher nearby as an extra precaution, especially if working near fuel components or in a garage. Lastly, remember to avoid inhaling any brake dust by using a mask or working in a well-ventilated area. These precautions not only protect you but also guarantee a confident, professional-grade brake pad replacement.
| Tool | Purpose |
|---|---|
| Jack & Jack Stands | Lift and support vehicle safely |
| Lug Wrench | Remove wheel bolts |
| C-Clamp/Caliper Tool | Compress caliper piston |
| Wire Brush | Clean brake components |
| Brake Cleaner | Remove brake dust and grease |

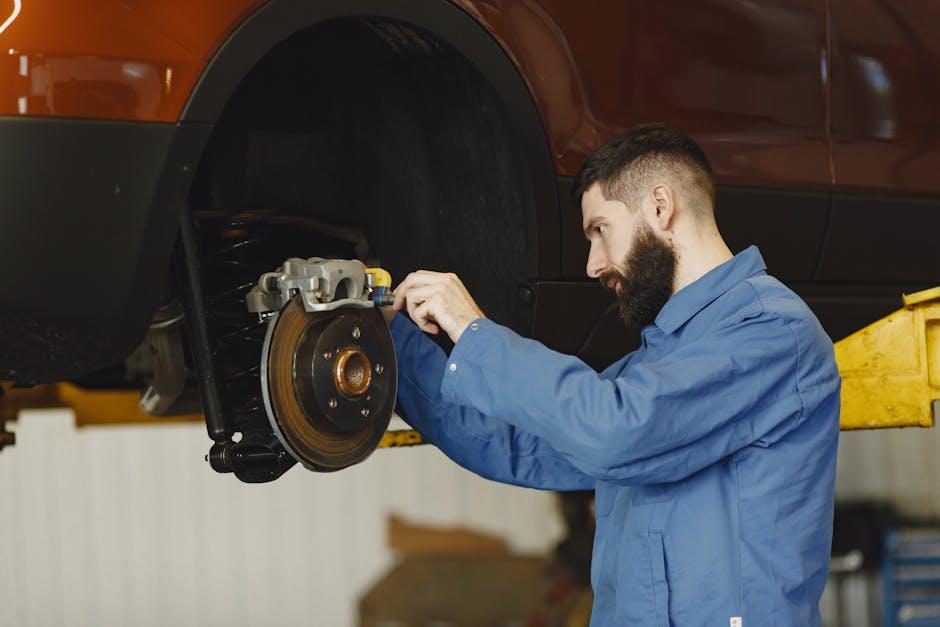
Step-by-Step Brake Pad Removal and Installation
Start by safely lifting your vehicle using a jack and securing it with jack stands. Before you touch the brake pads, remove the wheel using a lug wrench to expose the brake caliper. Carefully inspect the caliper bolts—they hold everything in place—and use the correct size socket to loosen and remove them. Slide the caliper off the brake rotor, then gently support it with a bungee cord or wire to avoid strain on the brake hose. Now, you’re ready to slide the worn brake pads out of their slots.
Installing the new brake pads requires precision and care:
- Compress the caliper piston slowly with a C-clamp or caliper tool to create space for the thicker new pads.
- Position the fresh brake pads exactly where the old ones were seated, ensuring they are flush and snug.
- Reattach the brake caliper by tightening the bolts securely to factory specifications.
- Replace the wheel and tighten the lug nuts in a star pattern for even pressure.
- Lower the car safely, then press the brake pedal several times to re-seat the pads before you hit the road.
| Tool | Purpose |
|---|---|
| Jack & Jack Stands | Lift and stabilize car |
| Lug Wrench | Remove and reinstall wheels |
| Socket Set | Unscrew caliper bolts |
| C-clamp | Push caliper piston back |
| Bungee Cord | Hold caliper safely |
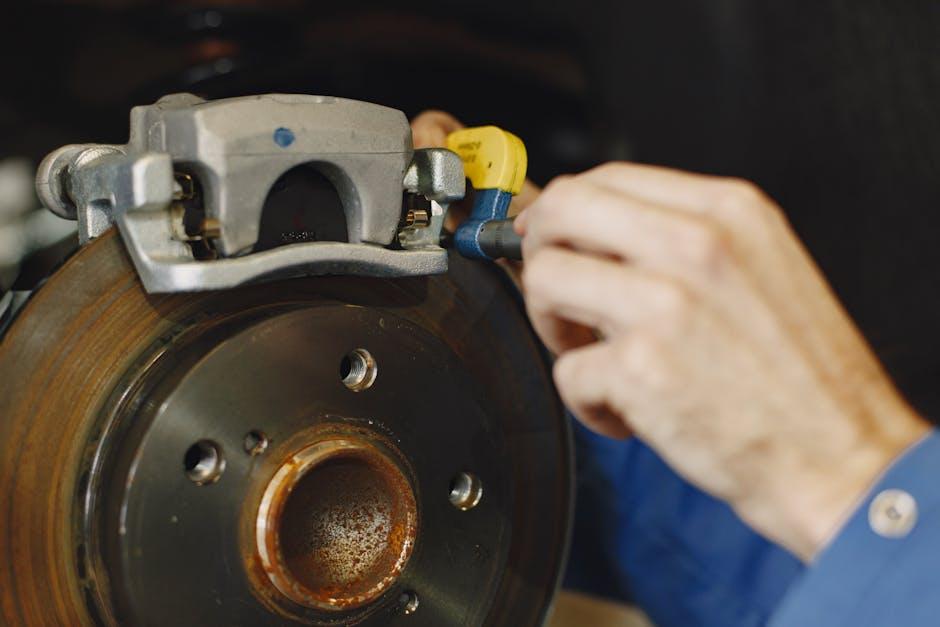
Tips for Inspecting and Maintaining Your Brake Rotors
When it comes to brake rotors, vigilance is key. Regularly check the surface for any signs of grooves, cracks, or rust buildup. These imperfections can significantly impair braking performance and lead to costly repairs if neglected. Use a flashlight and a magnifying glass to get a closer look, and don’t forget to run your fingers gently along the rotor edge to feel for uneven wear or warping. Keeping the rotors clean and free from debris is equally important—wipe them down with brake cleaner and a lint-free cloth during each brake pad replacement to maintain optimal function.
Proper maintenance goes beyond just inspection. Ensure rotors are within the manufacturer’s thickness specifications to avoid brake fade or failure. Here’s a quick overview of rotor thickness limits for common vehicle types:
| Vehicle Type | Min. Rotor Thickness (mm) |
|---|---|
| Compact Cars | 20 |
| Sedans | 22 |
| SUVs | 24 |
- Resurface or replace rotors that are uneven or below thickness specs.
- Torque lug nuts to manufacturer specs to avoid rotor warping.
- Avoid overheating brakes by driving cautiously during bed-in procedures.

Test Driving and Final Checks for Optimal Performance
Once the new brake pads are securely in place, it’s crucial to take your vehicle for a cautious test drive. Begin by driving at low speeds in a safe, open area to gently apply the brakes and listen for any unusual noises, such as squealing or grinding. Pay close attention to the brake pedal’s feel—it should be firm, not spongy, and the stopping distance should gradually improve as the pads bed in. This initial trial helps you confirm that the installation was successful and that the pads are functioning correctly under real-world conditions.
After the test drive, perform these essential final checks to guarantee optimal performance and safety:
- Inspect brake fluid levels and look for any signs of leaks around calipers and hoses.
- Verify that all bolts and clips are securely fastened and nothing is loose or out of place.
- Check rotor surfaces for smoothness—there should be no visible grooves or excessive wear.
- Ensure the parking brake operates smoothly and holds the vehicle securely on an incline.
| Checkpoint | Ideal Condition | Action if Off |
|---|---|---|
| Brake Pedal | Firm & Responsive | Bleed Air or Adjust Pads |
| Brake Fluid | At Max Level, No Leaks | Top Up or Repair Leak |
| Rotor Surface | Smooth & Even | Resurface or Replace |
| Parking Brake | Holds Firmly | Adjust Cable |
Q&A
Q: Why should I consider replacing my brake pads myself?
A: Replacing your brake pads on your own can save money, boost your mechanical confidence, and offer a hands-on understanding of your vehicle’s safety components. Plus, it’s a satisfying task that keeps you closer to your car’s heartbeat.
Q: What tools do I need for a DIY brake pad replacement?
A: At minimum, you’ll need a reliable jack and jack stands, a lug wrench, a C-clamp or brake caliper tool, socket set, and a flathead screwdriver. Don’t forget gloves and safety glasses—the unsung heroes of any DIY project.
Q: How do I know when my brake pads need replacing?
A: Listen for squeaking or grinding noises, feel for reduced braking responsiveness, or check if the pads appear thin—typically less than 1/4 inch thick. Some vehicles also have wear indicators or dashboard alerts.
Q: What’s the biggest challenge in replacing brake pads yourself?
A: The trickiest part is usually compressing the brake caliper piston before installing new pads. It requires patience and a steady hand to avoid damaging brake lines or causing uneven pad wear.
Q: How long does a brake pad replacement typically take?
A: For beginners, expect about 1.5 to 2 hours for all four wheels. Experienced DIYers can finish in under an hour. Remember, quality trumps speed when working on safety-critical parts.
Q: Can I replace just one brake pad or should I replace them in pairs?
A: It’s best to replace brake pads in pairs—both front wheels or both rear wheels—to maintain balanced braking performance and consistent wear.
Q: What safety precautions should I take during a brake pad replacement?
A: Always work on a flat surface, use jack stands rather than relying on just a jack, wear eye protection, and double-check that the parking brake is engaged before starting.
Q: How do I dispose of old brake pads?
A: Brake pads often contain hazardous materials, so check your local regulations for proper disposal or recycling options. Auto parts stores sometimes accept used pads for environmentally safe handling.
Q: After replacing brake pads, should I do anything special before driving?
A: Yes! Pump the brake pedal a few times to seat the new pads correctly. Avoid heavy braking for the first 200 miles to let the pads break in gradually—this helps maximize their lifespan and ensures optimal braking performance.
Q: When should I seek professional help instead of DIY?
A: If you notice leaks in the brake lines, hear unusual noises after replacement, or feel uncertain about the process at any step, it’s wise to consult a professional mechanic. Your safety is too important to compromise.
Future Outlook
Replacing your brake pads yourself can be a rewarding way to connect with your vehicle while ensuring your safety on the road. With patience, attention to detail, and the right tools, you’ve taken an important step toward automotive self-reliance. Remember, every turn of the wrench brings you closer to confidence behind the wheel, but never hesitate to seek professional advice if something feels uncertain. Now, with fresh pads in place and a job well done, it’s time to hit the road—smooth, safe, and empowered by your own two hands.
1 Comment
h6j95r