

There’s a special kind of satisfaction that comes from rolling up your sleeves and getting hands-on with your car. Performing a DIY oil change is more than just a money-saving hack—it’s an empowering ritual that connects you to the heartbeat of your vehicle. Whether you’re a seasoned gearhead or a curious beginner, this step-by-step guide will walk you through the essentials of changing your own oil, ensuring your engine runs smoothly and your wallet stays happy. Ready to dive under the hood? Let’s get started.
Table of Contents
- Choosing the Right Oil and Filter for Your Vehicle
- Preparing Your Workspace and Gathering Essential Tools
- Safely Draining Old Oil and Inspecting for Issues
- Replacing the Oil Filter with Precision and Care
- Pouring in Fresh Oil and Checking Fluid Levels
- Disposing of Used Oil Responsibly and Clean-Up Tips
- Q&A
- Final Thoughts
Choosing the Right Oil and Filter for Your Vehicle
Picking the appropriate oil and filter is an essential first step for any oil change. Your vehicle’s manufacturer recommendations serve as the gold standard; always check your owner’s manual for the specific oil viscosity and filter type needed. Using the correct oil weight (e.g., 5W-30 or 10W-40) ensures optimal engine performance across different temperatures. Synthetic oils generally offer longer-lasting protection and better resistance to breakdown, especially in extreme conditions or high-mileage engines. Meanwhile, conventional oils are budget-friendly and perfectly suitable for many everyday driving scenarios.
Choosing the right oil filter is just as crucial. Filters come in various designs such as conventional, synthetic blend, and high-efficiency media, each with different dirt-trapping abilities. A high-quality filter not only catches contaminants but also preserves oil pressure and flow for engine longevity. To help simplify your selection, here’s a quick reference table outlining oil types and their typical benefits:
| Oil Type | Best Use | Key Benefit |
|---|---|---|
| Conventional | Everyday driving | Cost-effective, trusted |
| Synthetic Blend | Moderate stress engines | Improved protection, value |
| Full Synthetic | High performance & extreme temps | Superior engine protection |
| High-Mileage | Engines 75,000+ miles | Seals & reduces leaks |

Preparing Your Workspace and Gathering Essential Tools
Before diving into the oil change process, setting up an organized and safe area is crucial. Select a flat surface, preferably concrete or asphalt, to park your vehicle securely. Ensure the engine is cool to avoid burns, and gather adequate lighting if you’re working indoors or during dusk. Protect your flooring with absorbent mats or newspapers to catch any accidental spills. Create a small zone dedicated only to your oil change tasks to avoid misplaced tools or distractions.
Having the right tools on hand not only speeds up the process but also minimizes frustration. Below is a checklist of essential items you’ll need before starting:
- Car jack and jack stands for elevating your vehicle safely.
- Oil filter wrench to remove the old oil filter without hassle.
- Drain pan to collect the used oil neatly and prevent mess.
- New oil and oil filter matching your vehicle specifications.
- Funnel to pour the new oil cleanly into the engine.
- Gloves and rags for cleanliness and safety.
- Socket wrench set for loosening bolts securely.
| Item | Purpose |
|---|---|
| Car Jack | Lift your car safely |
| Drain Pan | Collect used oil |
| Oil Filter Wrench | Remove old filter |
| Funnel | Pour new oil cleanly |
Safely Draining Old Oil and Inspecting for Issues
Begin by positioning your vehicle on a level surface and securely lifting it with jack stands to avoid accidents. Place an oil pan beneath the drain plug before loosening it with the appropriate wrench — this ensures no oil spills on your workspace. Allow the old oil to drain completely, which may take several minutes. Taking your time here is crucial to prevent leftover oil from contaminating the fresh supply later.
Once drained, inspect the oil’s color and texture. Dark, gritty oil signals it’s time for a change, but look closer for any metallic flakes or sludge that might indicate engine wear or impending issues. While the oil is draining, take the opportunity to examine the drain plug and washer for damage or excessive wear — replacing these small components can prevent leaks and ensure a tight seal when reinstalled.
- Use gloves to protect your hands from used oil.
- Dispose of old oil at authorized recycling centers.
- Check oil level dipstick after refill.
| Oil Condition | Potential Issue |
|---|---|
| Milky Oil | Coolant Leak |
| Thick Sludge | Overdue Oil Changes |
| Metallic Particles | Engine Wear |

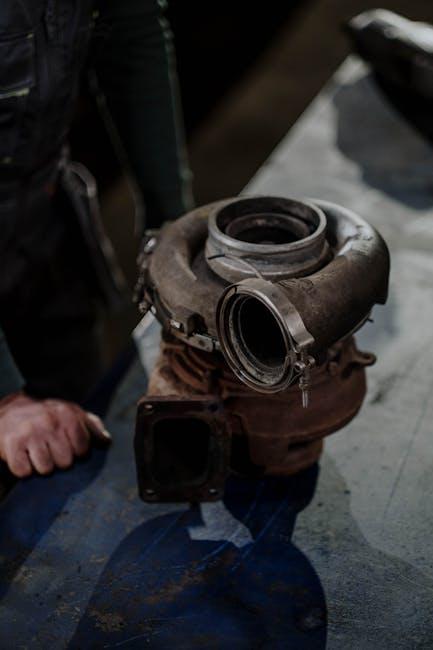
Replacing the Oil Filter with Precision and Care
Before installing the new oil filter, make sure to lubricate the rubber gasket with a bit of fresh oil. This small step ensures a tight seal to prevent leaks and makes removal easier during the next oil change. When positioning the filter, screw it on by hand until the gasket contacts the mounting surface, then give it an additional ¾ to 1 full turn—avoid using tools for tightening to prevent overtightening and damage.
Always double-check the manufacturer’s specifications to confirm the correct filter type and torque recommendations. Here’s a simple reference guide to help you match your vehicle with the right filter style:
| Vehicle Type | Filter Style | Typical Torque |
|---|---|---|
| Compact Cars | Spin-on Cartridge | 15-20 Nm |
| SUVs & Light Trucks | Canister Style | 18-25 Nm |
| Motorcycles | Cartridge Inline | 8-12 Nm |
- Use a clean rag to wipe the mounting surface before installation.
- Dispose of the old filter according to local regulations.
- Recheck for leaks after running the engine for a few minutes.

Pouring in Fresh Oil and Checking Fluid Levels
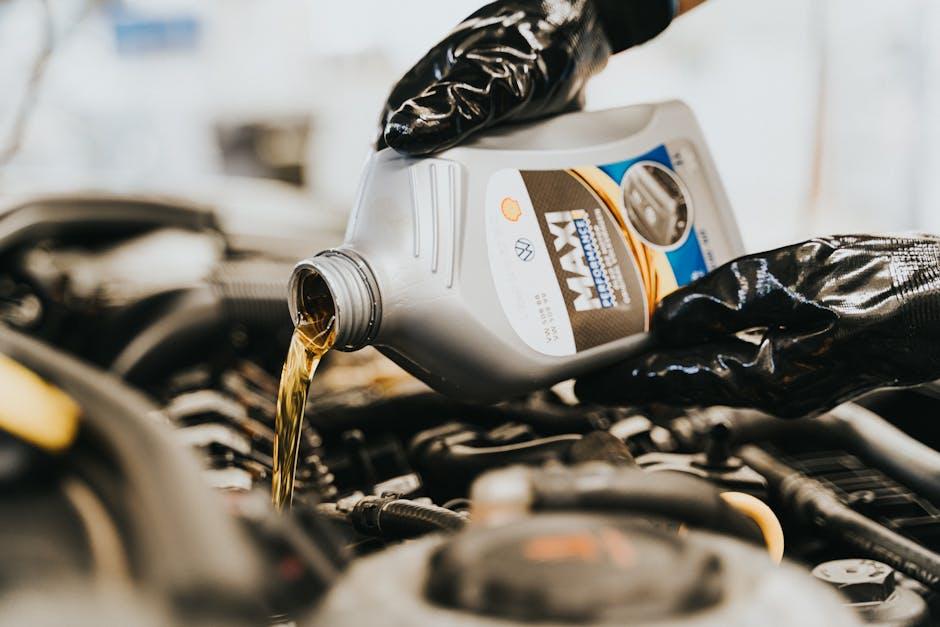
Before you pour in the fresh oil, make sure to double-check your vehicle’s specific oil type and quantity requirements, usually found in the owner’s manual or on the oil cap. Use a clean funnel to pour the oil slowly into the engine’s fill hole, preventing spills and ensuring precise measurement. As you add the fluid, keep an eye on the dipstick to avoid overfilling, since too much oil can cause engine damage or leaks. Patience at this stage guarantees a smooth-running engine and extends its lifespan.
Once the oil is topped off, take a moment to inspect other fluid levels that keep your car running smoothly. Check the brake fluid, coolant, power steering fluid, and windshield washer fluid reservoirs for appropriate volumes and clarity. Here’s a handy quick-reference guide to fluid levels and their ideal conditions:
| Fluid | Level Check | Ideal Condition |
|---|---|---|
| Brake Fluid | Between min & max marks | Clear, pale yellow |
| Coolant | Fill line on reservoir | Bright green/blue or pink |
| Power Steering | Between min & max marks | Transparent and clean |
| Windshield Washer | Above minimum mark | Clear with no debris |

Disposing of Used Oil Responsibly and Clean-Up Tips
Properly handling used motor oil is crucial not only for environmental protection but also for keeping your workspace safe and clean. After draining the oil, ensure you store it in a sealed, leak-proof container—an old oil bottle or a sturdy plastic jug works perfectly. Avoid mixing the oil with other fluids like antifreeze or solvents, as this contaminates recyclables and complicates disposal. Many local auto shops, recycling centers, and hazardous waste facilities offer free or low-cost oil recycling programs. Always check your community’s guidelines for the nearest drop-off locations to keep this potentially harmful substance out of our soil and water.
Cleaning up unexpected spills quickly limits damage and stains. Use absorbent materials such as cat litter, sawdust, or commercial oil absorbents to soak up oil spills, then sweep or scoop the residue into a disposable bag. For stubborn oil stains on concrete, a paste of baking soda and water or a commercial degreaser can lift the mark with gentle scrubbing. Follow safety precautions like ventilating the area and wearing gloves to protect your skin. Here’s a quick reference table to handle various clean-up scenarios effectively:
| Spill Size | Recommended Absorbent | Cleanup Tip |
|---|---|---|
| Small Drops | Cat litter or baking soda | Sprinkle and sweep up after 10 mins |
| Moderate Spill | Sawdust or commercial absorbent pads | Cover spill completely, then dispose |
| Large Spill | Oil absorbent booms or granular absorbents | Contain spill, call local hazards team if necessary |
Q&A
Q&A: DIY Oil Change – Step-by-Step Guide
Q1: Why should I consider doing my own oil change?
A: Changing your own oil saves money, gives you hands-on knowledge about your vehicle’s condition, and ensures you’re using quality oil and filters. It’s a satisfying way to take control of your car’s maintenance.
Q2: What tools and materials will I need?
A: You’ll need engine oil (check your owner’s manual for the right type and amount), a new oil filter, an oil filter wrench, a socket wrench for the drain plug, a drain pan, gloves, a funnel, and rags or paper towels for cleanup.
Q3: How do I prepare my car for an oil change?
A: Park your car on a level surface and engage the parking brake. Warm the engine slightly by running it for 5 minutes—warm oil drains faster and more completely. Then, turn off the engine and let it cool for a few minutes to avoid burns.
Q4: What are the main steps in the DIY oil change process?
A:
- Locate the oil drain plug under your car and place the drain pan beneath it.
- Unscrew the drain plug carefully and let the old oil drain completely.
- Remove the oil filter with the wrench and let any trapped oil drain out.
- Apply a little fresh oil to the new filter’s rubber gasket and screw it in place by hand.
- Replace the drain plug securely.
- Pour the new oil into the engine using a funnel, checking levels with the dipstick.
- Start the engine and check for leaks.
- Dispose of old oil responsibly at a recycling center.
Q5: How do I know if I’ve done the oil change correctly?
A: After refilling, the oil level should be within the recommended range on the dipstick. No leaks should appear around the drain plug or filter. Your engine should run smoothly without unusual noises. If in doubt, a quick visit to a mechanic can give peace of mind.
Q6: How often should I change my car’s oil?
A: Typically, every 3,000 to 7,500 miles depending on your vehicle and oil type. Check your owner’s manual for your manufacturer’s recommendation. Regular changes keep your engine running clean and efficient.
Q7: Are there any safety tips I should keep in mind?
A: Always use gloves to protect your skin from hot oil. Never underestimate the temperature of your engine parts. Use jack stands if you lift your car rather than relying solely on a jack. Work in a well-ventilated area and clean spills promptly to avoid slips.
Q8: What are common mistakes to avoid?
A: Forgetting to replace the drain plug washer, overtightening or undertightening plug and filter, using the wrong oil type, or skipping disposal steps. Each slip could cost you time or damage your engine.
Q9: Can I do this on any vehicle?
A: Most cars allow for DIY oil changes, but some newer models have sealed systems or special requirements. Always consult your owner’s manual. If the process seems too complex or requires special tools, professional service is a safe bet.
Q10: What environmental considerations should I be aware of?
A: Never pour old oil down drains or on the ground. It’s toxic and pollutes water. Store used oil in a sealed container and take it to a recycling facility or auto shop that accepts used oil for proper disposal. Being eco-friendly is part of responsible car care.
Final Thoughts
With every turn of the wrench and every drop of fresh oil, you’re not just maintaining your vehicle—you’re reclaiming a bit of independence and confidence under the hood. DIY oil changes might seem daunting at first, but armed with the right tools and a clear guide, it becomes a satisfying ritual rather than a chore. So, roll up your sleeves, trust the process, and enjoy the quiet pride that comes from knowing you’ve taken control of your car’s care, one simple step at a time. Your engine will thank you.
109 Comments
https://t.me/s/rating_online/3
https://t.me/Official_1xbet_1xbet/s/1035
https://t.me/Official_1xbet_1xbet/1617
https://t.me/s/Official_1xbet_1xbet/1743
https://t.me/Official_1xbet_1xbet/1834
https://t.me/s/Official_1xbet_1xbet/1629
https://t.me/Official_1xbet_1xbet/1723
https://t.me/s/Official_1xbet_1xbet/1701
https://t.me/s/Official_1xbet_1xbet/1776
https://t.me/s/topslotov
[https://t.me/s/official_1win_aviator](https://t.me/s/official_1win_aviator)
https://t.me/s/reiting_top10_casino/3
https://t.me/s/reiting_top10_casino/10
https://t.me/s/reiting_top10_casino/4
https://t.me/reiting_top10_casino/6
https://t.me/s/reiting_top10_casino/9
https://t.me/reiting_top10_casino/2
https://t.me/s/reiting_top10_casino/7
https://t.me/s/reiting_top10_casino/2
https://t.me/s/reiting_top10_casino/6
https://t.me/reiting_top10_casino/4
https://t.me/reiting_top10_casino/9
https://t.me/reiting_top10_casino/8
https://t.me/s/reiting_top10_casino/8
https://t.me/reiting_top10_casino
https://t.me/s/reiting_top10_casino
https://t.me/reiting_top10_casino/10
https://t.me/reiting_top10_casino/7
https://t.me/s/Gaming_1xbet
https://t.me/s/PlayCasino_1xbet
https://t.me/s/PlayCasino_1xbet
https://t.me/s/PlayCasino_1win
https://t.me/s/PlayCasino_1win
https://t.me/s/ofitsialniy_1win/33/evith
https://t.me/s/ofitsialniy_1win
https://t.me/s/iw_1xbet
https://t.me/s/Official_beefcasino
https://t.me/s/Beefcasino_rus/46
https://t.me/Official_mellstroy_casino/37
https://t.me/s/Official_mellstroy_casino/47
https://t.me/s/Best_promocode_rus/2944
https://t.me/Best_promocode_rus/3276
https://t.me/s/Beefcasino_rus/57
https://t.me/s/Ud_GAMa
https://t.me/s/ud_1XsLOtS
https://t.me/s/official_1win_aviator/45
https://t.me/s/ud_poKERdoM
https://t.me/s/Ud_pIn_up
https://t.me/s/tf_1win
https://t.me/s/Top_bk_ru
https://t.me/s/uD_KomEtA
https://t.me/s/UD_gGbET
https://t.me/s/ud_keNT
https://t.me/s/official_1win_aviator/217
https://t.me/s/ke_MostBet
https://t.me/s/ke_CatCasino
https://t.me/s/kef_Lex
https://t.me/s/ke_JoyCasino
https://t.me/s/kef_Rox
https://t.me/s/ke_PlayFortuna
https://t.me/s/ke_Riobet
https://t.me/s/ke_mellstroy
https://t.me/s/ke_Legzo
https://t.me/s/ke_DragonMoney
https://t.me/s/ke_Sol
https://t.me/s/ke_Volna
https://t.me/s/ke_Daddy
https://t.me/s/ke_Drip
https://t.me/s/ke_Gizbo
https://t.me/s/ke_1Win
https://t.me/s/ke_1Go
https://t.me/s/kef_beef
https://t.me/s/ke_Stake
https://t.me/s/ke_1xbet
https://t.me/s/ke_Flagman
https://t.me/s/ke_Martin
https://t.me/s/ke_Izzi
https://t.me/s/ke_Pin_Up
https://t.me/s/ke_Booi
https://t.me/s/ke_1xSlots
https://t.me/s/ke_Monro
https://t.me/s/ke_Gama
https://t.me/s/ke_MrBit
https://t.me/s/ke_Kometa
https://t.me/s/top_kazino_z
https://t.me/a_Top_onlinecasino/19
https://t.me/topcasino_rus/
https://t.me/s/official_Leon_ed
https://t.me/s/official_Pinco_ed
https://t.me/iGaming_live/4553
https://t.me/s/Stake_egs/6
https://t.me/s/Monro_egs/18
https://t.me/iGaming_live/4629
https://t.me/va_1xbet
https://t.me/ah_1xbet/11
https://t.me/s/ah_1xbet/15
https://t.me/s/Best_rating_casino
https://t.me/reyting_topcazino/16
https://t.me/topcasino_rus/
https://t.me/a_Topcasino/5
https://telegra.ph/Top-kazino-11-14-2
https://t.me/s/kazino_bez_filtrov
https://t.me/da_1xbet/10
https://t.me/da_1xbet/5
https://t.me/da_1xbet/15
https://t.me/da_1xbet/13
https://t.me/da_1xbet/11
https://t.me/da_1xbet/7
https://t.me/da_1xbet/12