

When your car refuses to roar to life on a chilly morning or after long hours of idling, it’s often a dead battery standing between you and the open road. Jump starting a car is a practical skill that can rescue you from a sticky situation, but it’s not a task to be rushed or taken lightly. Knowing how to jump start a car safely ensures you protect both yourself and your vehicle while getting back on track quickly. In this article, we’ll explore the essential steps, precautions, and tips to help you master the art of jump starting with confidence and care.
Table of Contents
- Preparing Your Vehicle and Safety Gear Before Jump Starting
- Understanding the Role of Each Jumper Cable Color
- Step-by-Step Guide to Connecting Cables Correctly
- Common Mistakes to Avoid When Jump Starting a Car
- Signs Your Battery or Alternator May Need Professional Help
- Essential Aftercare Tips to Maintain Your Car Battery Health
- Q&A
- The Way Forward

Preparing Your Vehicle and Safety Gear Before Jump Starting
Before attempting to jump start your vehicle, ensuring both the dead battery car and the assisting vehicle are properly prepared is crucial. Begin by parking the vehicles close enough so the jumper cables can reach both batteries but keep them from touching to avoid accidental grounding. Turn off all electrical components such as headlights, radios, and air conditioning to prevent power surges. Once parked, engage the parking brakes on both cars for added safety, and if available, put the vehicles in park or neutral with the ignition off. This preparation helps prevent unexpected movement that could cause injury or damage.
Equally important is wearing the appropriate safety gear. Protective gloves and safety goggles shield your hands and eyes from harmful battery acid and sparks. Keep a fire extinguisher rated for electrical fires nearby as a precaution. Always inspect your jumper cables for any signs of wear or damage such as exposed wires or frayed insulation to avoid short circuits. With these proactive steps, you set the stage for a successful and safe jump start.
- Park vehicles properly – close but not touching
- Turn off all electrical equipment
- Engage parking brakes and set transmission correctly
- Wear gloves and goggles for protection
- Inspect jumper cables for damage
- Keep a fire extinguisher nearby
Understanding the Role of Each Jumper Cable Color
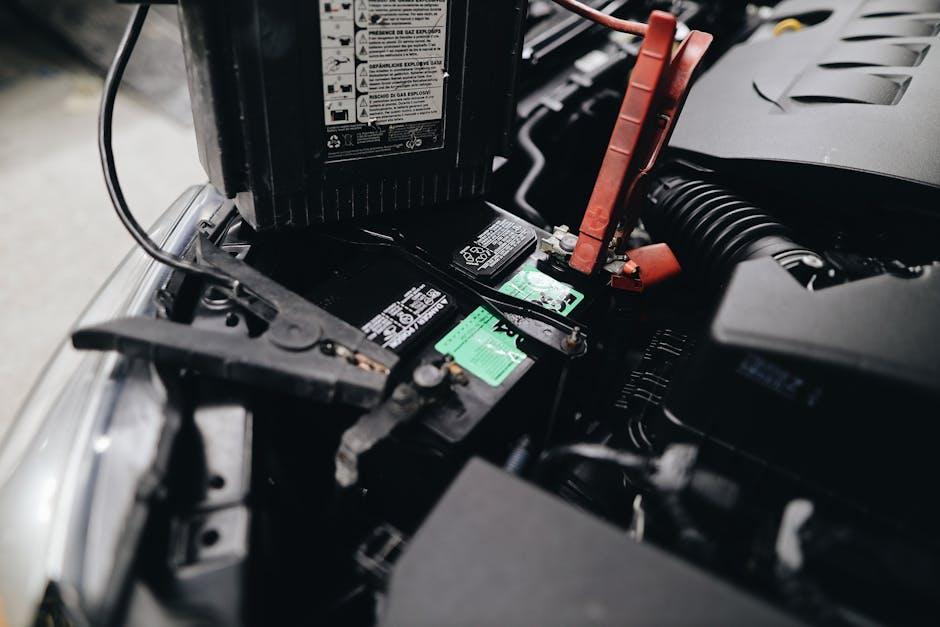
When it comes to jump-starting a vehicle, the color of each jumper cable isn’t just for aesthetics—it’s a crucial indicator of its function. Red cables are always positive (+), and they connect to the positive terminals of both vehicles’ batteries. On the other hand, black cables are negative (-) and are intended for grounding. Notably, the black cable should be attached to an unpainted, metal part of the disabled car’s engine block rather than directly to the battery to avoid sparks and ensure safety.
Understanding these color codes ensures a proper flow of electricity, reduces the risk of short circuits, and protects you from potential hazards. Here’s a quick reference to keep handy:
| Color | Connection Point | Purpose |
|---|---|---|
| Red | Battery Positive Terminal (+) | Transfers positive voltage |
| Black | Metal Ground (Engine block) | Completes the circuit, prevents sparks |
Always remember, mixing up these connections can cause electrical damage or personal injury, so double-check the color-coded cables before jumping your car. Safety and clear understanding go hand in hand!

Step-by-Step Guide to Connecting Cables Correctly
Begin by identifying the positive and negative terminals on both vehicles’ batteries. Always connect the red cable to the positive (+) terminals first, as this reduces the risk of short circuits. Make sure the black cable, which serves as the ground, is connected last and to a solid, unpainted metal part of the dead car’s engine block—not directly to the negative (-) terminal. This simple step helps prevent sparks near the battery, which can be hazardous.
Here’s a quick reference to ensure your connections are safely and effectively established:
| Cable | First Connection | Second Connection | Connection Tip |
|---|---|---|---|
| Red (Positive) | Good Battery Positive Terminal | Dead Battery Positive Terminal | Connect before black cables |
| Black (Negative) | Good Battery Negative Terminal | Engine Block or Metal Surface (Dead Car) | Avoid dead battery negative terminal |
Following this order not only maximizes safety but also ensures a smooth transmission of power to your car’s battery without damaging sensitive electronics. Always double-check that the cables are secure and clear of moving parts before cranking the ignition.

Common Mistakes to Avoid When Jump Starting a Car
Jump starting a car may seem straightforward, but overlooking key details can lead to frustrating or even dangerous results. One of the most common slip-ups is connecting the cables in the wrong order, which can cause electrical shorts or damage to your vehicle’s battery and electronics. Always attach the red positive (+) terminals first and finish with the black negative (-) terminal on the working battery. Another frequent error is failing to confirm the battery voltage compatibility between the two vehicles. Using a 12V battery to jump start a 24V system (or vice versa) can wreck electrical components.
Neglecting to inspect the cables for wear and tear or corrosion before jumping is a mistake that can hinder the process or create sparks. Additionally, attempting to jump start a car with a damaged or cracked battery can lead to acid leaks and serious injuries. Remember to keep the clamps from touching each other during the entire operation to avoid short circuits. The table below highlights these pitfalls to watch out for while jump starting:
| Mistake | Consequence | How to Avoid |
|---|---|---|
| Incorrect cable connection | Electrical shorts, damage | Follow correct clamp order |
| Voltage incompatibility | System failure | Check battery voltage first |
| Using damaged cables | Sparks, failed jump start | Inspect cables before use |
| Clamps touch each other | Short circuit risk | Ensure clamps are separated |

Signs Your Battery or Alternator May Need Professional Help
When your vehicle struggles to start even after multiple jump-start attempts, it could signal deeper electrical issues beyond a dead battery. Pay attention to dim headlights or flickering dashboard lights, which often indicate the alternator isn’t charging the battery adequately. Another telltale sign is a persistently weak or slow engine crank sound that doesn’t improve with jumper cables, hinting that the battery might be holding a poor charge or nearing the end of its life cycle.
Other subtle symptoms you should watch for include:
- Warning lights: A battery-shaped icon or “Check Engine” alert may illuminate unpredictably.
- Strange odors: A burnt rubber or sour smell near the battery area can indicate overheating or corrosion.
- Electrical glitches: Radios, power windows, or interior lights intermittently failing can be early clues.
| Symptom | Possible Cause |
|---|---|
| Dim or flickering headlights | Faulty alternator |
| Slow engine crank despite jump start | Weak or failing battery |
| Warning lights on dashboard | Electrical system malfunction |
Essential Aftercare Tips to Maintain Your Car Battery Health
Keeping your car battery in top shape is crucial for a hassle-free driving experience. Start by regularly inspecting the battery terminals for any signs of corrosion or buildup, which can hamper electrical conductivity. A simple mixture of baking soda and water applied with a brush can gently clean the terminals, ensuring a solid connection. Additionally, avoid letting your battery drain completely by turning off accessories like headlights and the radio before shutting your vehicle off.
Maintaining optimal battery health also means watching your driving habits. Short trips may not provide enough time to fully recharge the battery, so try to take your car on longer drives periodically. Invest in a quality battery charger or maintainer if your vehicle sits idle for extended periods. Below is a quick checklist to enhance your battery’s lifespan:
- Keep terminals clean and free of corrosion
- Limit short trips to ensure full charging cycles
- Secure battery hold-downs to prevent vibrations
- Use a battery maintainer if unused for long periods
| Action | Frequency | Benefit |
|---|---|---|
| Terminal cleaning | Monthly | Prevents corrosion build-up |
| Battery voltage check | Quarterly | Ensures optimal charge levels |
| Full charge drives | Weekly | Keeps battery fully charged |
Q&A
Q: What is the first thing I should do before jump starting my car?
A: Safety first! Begin by reading your vehicle’s owner’s manual. Different cars have different battery locations and jump starting procedures. Also, make sure both cars are turned off, parked in neutral or park with parking brakes engaged.
Q: What equipment do I need to jump start a car?
A: You’ll need a good pair of jumper cables and a second vehicle with a fully charged battery. Alternatively, portable jump starters work well if you don’t have another car nearby.
Q: How do I position the vehicles correctly?
A: Park the donor car close enough so that the jumper cables can reach both batteries, but avoid the vehicles touching each other. This prevents any accidental electrical contact.
Q: How should I connect the jumper cables?
A: Follow this order:
- Connect the red positive (+) clamp to the dead battery’s positive terminal.
- Connect the other red positive (+) clamp to the donor battery’s positive terminal.
- Connect the black negative (–) clamp to the donor battery’s negative terminal.
- Connect the remaining black clamp to an unpainted metal surface on the dead car’s engine block—far from the battery—to prevent sparks.
Q: Why do I connect the last negative clamp away from the battery?
A: Attaching the final clamp to the engine block reduces the risk of explosive gases near the battery igniting. It creates a safer ground connection.
Q: What should I do after connecting the cables?
A: Start the donor vehicle and let it run for a few minutes to charge the dead battery. Then, try to start the car with the dead battery. If it starts, leave both cars running for a few minutes before disconnecting cables.
Q: How do I safely disconnect the jumper cables?
A: Remove them in reverse order of how you connected:
- Black clamp from the engine block of the jump-started car.
- Black clamp from the donor car’s negative terminal.
- Red clamp from the donor car’s positive terminal.
- Red clamp from the jump-started car’s positive terminal.
Q: Can jump starting damage my car?
A: If done correctly, jump starting is safe. However, improper connections or faulty cables can cause sparks, battery damage, or electrical system problems. Always ensure correct polarity and solid clamp connections.
Q: What if my car doesn’t start after a jump?
A: The battery might be completely dead, or there could be a more serious electrical issue. Try again after waiting a bit, but if it still fails, it’s best to call for roadside assistance.
Q: Any extra tips for a smooth jump start?
A: Wear safety glasses and gloves if you have them. Avoid leaning directly over batteries. Once started, consider driving the jump-started car for at least 15 minutes to recharge the battery fully. And always double-check your cable connections—red to red, black to black!
The Way Forward
Mastering the art of jump-starting a car safely is more than just a handy skill—it’s a confidence booster for those unexpected moments on the road. With a calm approach, the right tools, and a clear understanding of the steps, you can turn a dead battery into a fresh start without a hitch. Remember, safety first: double-check connections, keep sparks at bay, and take your time. When the engine roars back to life, you’ll know you did more than get going—you did it smart. So next time your car stalls in a quiet parking lot or a busy street, you’ll be ready to jump into action with steady hands and a cool head. Safe travels ahead!