

There’s something about a fresh, spotless car interior that transforms the everyday drive into a small moment of luxury. Yet, despite our best efforts, stains on car upholstery happen—be it from a spilled coffee, track marks from muddy shoes, or an unexpected splash of soda. Removing these stubborn blemishes can feel like a daunting chore, but with the right techniques and a little know-how, your car’s interior can look as good as new. In this article, we’ll explore practical, step-by-step methods to tackle common stains, helping you refresh your vehicle’s upholstery and reclaim that pristine feeling behind the wheel.
Table of Contents
- Choosing the Right Cleaning Products for Car Upholstery
- Pre-Treatment Techniques for Tough Stains
- Step-by-Step Guide to Removing Common Stains
- Using Homemade Solutions for Eco-Friendly Cleaning
- Protecting and Maintaining Upholstery After Stain Removal
- When to Seek Professional Help for Stubborn Stains
- Q&A
- Insights and Conclusions
Choosing the Right Cleaning Products for Car Upholstery
When selecting cleaning products for your car’s upholstery, it’s essential to prioritize formulas that are both effective and gentle. Harsh chemicals can damage fibers or cause discoloration, turning a minor stain removal task into a costly upholstery repair. Opt for products labeled specifically for vehicle interiors, as they are engineered to tackle common stains without compromising fabric integrity. Test any cleaner on a small, hidden section of your car seat before applying it broadly to ensure color fastness and material tolerance.
To simplify your cleaning process, keep a few essentials handy:
- Foaming Upholstery Cleaner: Penetrates fabric for deep stain removal without oversaturation.
- Microfiber Cloths: Non-abrasive and perfect for lifting dirt without scratching surfaces.
- Soft-Bristled Brush: Helps agitate stubborn spots gently.
| Type of Upholstery | Recommended Cleaner | Common Stains Best Removed |
|---|---|---|
| Fabric | Water-based Foam | Food, Dirt, Beverage Spills |
| Leather | Pleather Cleaner & Conditioner | Oil, Ink, Watermarks |
| Vinyl | Mild Soap Solution | Grease, Mud, Ink |
Pre-Treatment Techniques for Tough Stains
Before you dive into the actual cleaning process, it’s essential to give those stubborn stains a head start. Begin by gently blotting the area with a clean, dry cloth to absorb any excess liquid or residue. Next, apply a suitable pre-treatment solution specifically designed for car upholstery—whether it’s fabric, leather, or vinyl. These solutions help to break down the stain’s molecular grip, making it easier to lift away during cleaning. When selecting your pre-treatment, keep in mind the type of stain you’re dealing with, as targeted formulations work wonders on grease, ink, or food-based blemishes.
To maximize the effectiveness of your pre-treatment approach, consider these handy tips:
- Test first: Always perform a spot test on an inconspicuous area to ensure colorfastness and material safety.
- Let it dwell: Allow the pre-treatment to sit for 5–10 minutes, giving it time to penetrate deeply without drying out.
- Use gentle agitation: For fabric seats, softly massage the solution with a soft-bristled brush to loosen tough particles.
- Wipe with care: Avoid scrubbing harshly, which can damage fibers or leather finishes.
| Stain Type | Recommended Pre-Treatment | Key Benefit |
|---|---|---|
| Oil/Grease | Enzymatic cleaner | Breaks down oily residues |
| Ink | Alcohol-based solution | Dissolves ink pigments |
| Food/Drink | pH-neutral upholstery cleaner | Gentle stain lifting |

Step-by-Step Guide to Removing Common Stains
Start by gently bloting the stain with a clean, white cloth to absorb as much of the spill as possible. Avoid rubbing, which can push the stain deeper into the upholstery fibers. For water-based stains like juice or coffee, mix a solution of mild dish soap and warm water. Dip a soft-bristle brush or a microfiber cloth into the solution and gently work from the outside toward the center. This method helps prevent the stain from spreading further. Always test the cleaning solution on a hidden area first to ensure it does not discolor your fabric.
When tackling stubborn oil or grease stains, sprinkle baking soda or cornstarch over the affected area and let it sit for 15-20 minutes to absorb excess oils. Afterward, carefully vacuum up the powder. For an extra lift, try a homemade vinegar and water solution (equal parts), applying it sparingly with a cloth and blotting dry. Here’s a quick reference guide to help you decide which method suits your stain best:
| Stain Type | Recommended Treatment |
|---|---|
| Beverages (Coffee, Juice) | Mild soap and warm water |
| Grease/Oil | Baking soda or cornstarch, then vinegar solution |
| Mud/Dirt | Dry brushing, then soap and water |
| Ink | Rubbing alcohol dabbed carefully |
- Always use gentle, upward motions to avoid damaging the upholstery.
- Work in a well-ventilated area to speed drying time and prevent mold.
- Dry the cleaned area thoroughly using a fan or natural air to avoid watermarks.
Using Homemade Solutions for Eco-Friendly Cleaning
Opting for homemade cleaning solutions not only spares your vehicle from harsh chemicals but also champions sustainability by reducing toxins released into the environment. Ingredients like white vinegar, baking soda, and mild dish soap can be combined to create powerful stain removers that penetrate deep into upholstery fibers without causing damage. For instance, a mixture of one cup of warm water, two tablespoons of vinegar, and one teaspoon of dish soap makes an effective spray for tackling stubborn spills with ease and eco-consciousness.
When preparing your homemade solution, keep these tips in mind:
- Test on a small, inconspicuous area first to ensure fabric safety.
- Apply gently using a microfiber cloth or soft brush to avoid fiber wear.
- Allow the mixture to sit for a few minutes before blotting to lift stains thoroughly.
- Always rinse with a clean damp cloth to remove residue completely.
| Stain Type | Recommended Homemade Solution | Application Tip |
|---|---|---|
| Oil & Grease | Baking soda paste (baking soda + water) | Sprinkle, let sit 15 mins, then brush off |
| Coffee & Tea | Vinegar and dish soap spray | Blot gently, avoid rubbing harshly |
| Ink | Rubbing alcohol solution | Dab carefully with cotton swab |
| Food | Warm water and mild detergent | Use circular motion to lift stains |

Protecting and Maintaining Upholstery After Stain Removal
Once stains have been effectively removed, the focus shifts to preserving the vibrancy and durability of your car’s upholstery. To extend the life of your seats, consider applying a fabric protector spray that repels future spills and dirt. Regularly vacuuming your upholstery prevents dust and debris from embedding deep into the fibers, which can cause premature wear. Additionally, always avoid eating or drinking inside the car to minimize the risk of fresh stains forming.
Maintenance is equally about timely intervention and prevention. Following these simple steps can make a world of difference:
- Use seat covers: They act as a first line of defense while adding a layer of style.
- Keep windows slightly open on hot days: This reduces moisture buildup that can lead to mold or mildew.
- Condition leather seats: For leather upholstery, apply conditioner every 3-6 months to keep the material supple and crack-free.
| Maintenance Habit | Benefit |
|---|---|
| Vacuum weekly | Prevents dirt accumulation |
| Protective sprays | Enhances stain resistance |
| Leather conditioner | Maintains softness and prevents cracking |
When to Seek Professional Help for Stubborn Stains
Sometimes, no matter how carefully you treat your car upholstery, certain stains cling stubbornly and refuse to budge. If you’ve already tried homemade solutions and commercial stain removers without success, it might be time to consider professional assistance. Persistent stains such as ink, oil, or deep-set food spills often require specialized cleaning techniques and equipment that go beyond common household methods.
Look out for warning signs that suggest it’s best to call in the experts:
- Recurrent stains: Marks that reappear after cleaning attempts.
- Fabric damage risk: Upholstery starting to fade, fray, or weaken.
- Unpleasant odors: Lingering smells that DIY methods can’t eliminate.
- Complex material types: Leather or suede that demands gentle, professional care.
| Stain Type | DIY Success Rate | Recommended Action |
|---|---|---|
| Coffee & Tea | High | Home treatment effective |
| Ink & Dye | Low | Professional cleaning advised |
| Grease & Oil | Medium | Use specialized products or pros |
| Red Wine & Juice | Medium | Quick action or professional help |
Q&A
Q&A: How to Remove Stains from Car Upholstery
Q1: Why is it important to remove stains from car upholstery quickly?
A1: Stains left unattended tend to set deeper into the fabric, making them tougher to remove. Acting promptly prevents the stain from becoming permanent and helps maintain the car’s interior looking fresh and clean.
Q2: What common household items can be used to clean car upholstery stains?
A2: Many stains can be tackled with simple items like white vinegar, baking soda, dish soap, or even club soda. These are gentle yet effective, making them a great first line of defense before reaching for stronger cleaners.
Q3: How do I safely test a cleaning product on my car’s upholstery?
A3: Always test any cleaner on a small, hidden patch of fabric first. This helps ensure the product doesn’t cause discoloration or damage to the upholstery before treating the visible stain.
Q4: What is the best method for treating a liquid spill on fabric seats?
A4: Blot the spill immediately with a clean, dry cloth to absorb moisture—avoid rubbing, which spreads the stain. Then apply a mild detergent solution or a vinegar-water mix to gently lift the stain. Finish by blotting dry and allowing the seat to air out.
Q5: How can I handle tough stains like grease or ink?
A5: Grease can often be loosened with a bit of baking soda sprinkled on top before gently brushing it off. Ink stains might require a specialty cleaner designed for upholstery or rubbing alcohol applied carefully. In both cases, patience and repeated gentle applications help avoid fabric damage.
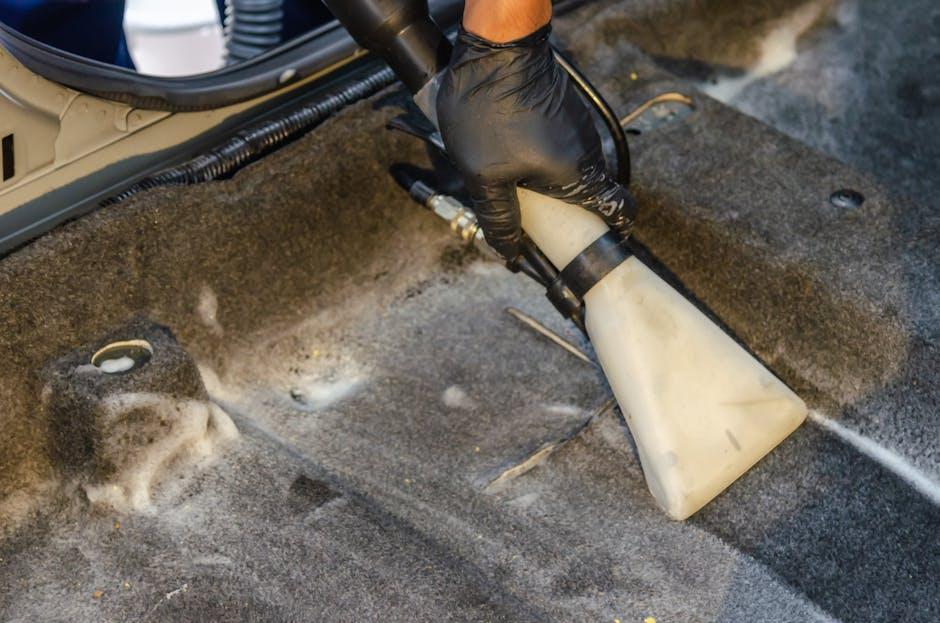
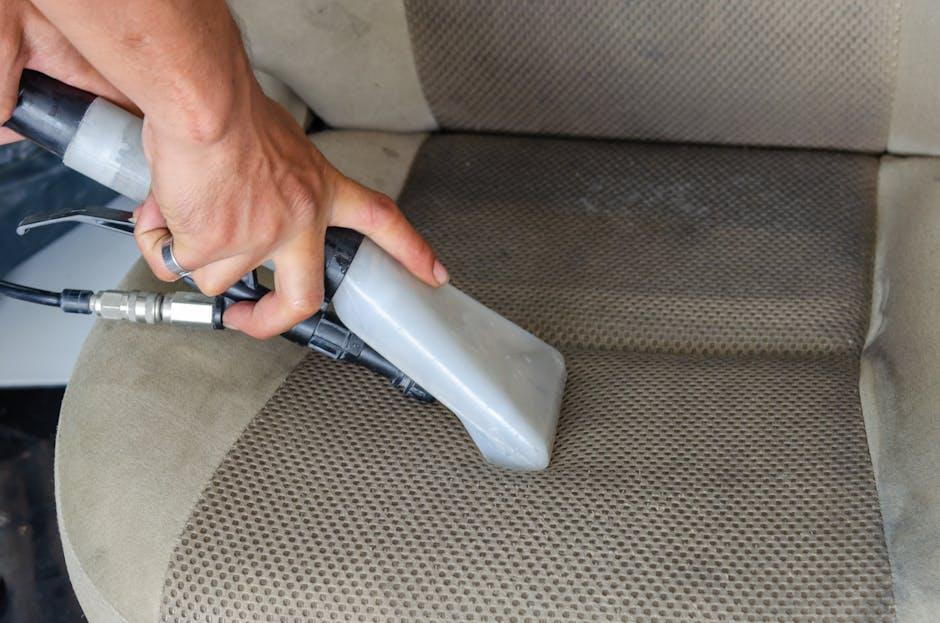
Q6: Are steam cleaners effective for upholstery stain removal?
A6: Yes, steam cleaners can penetrate deep into fabric fibers and loosen dirt and stains without chemicals. However, they should be used according to manufacturer instructions, and upholstery should not be oversaturated to prevent mold or mildew.
Q7: How can I prevent stains from happening in the first place?
A7: Using seat covers, avoiding eating and drinking in the car, and applying fabric protectants can create a barrier against stains. Regular vacuuming and quick clean-ups also keep upholstery looking pristine.
Q8: When should I consider professional cleaning?
A8: If stains are stubborn, old, or widespread, professional upholstery cleaning may be the safest and most effective choice. Professionals have tools and solutions tailored for various fabrics that can restore the interior without damage.
Removing stains from car upholstery doesn’t have to be daunting. With quick action, household items, and a bit of care, your car’s interior can stay spot-free and inviting for every ride.
Insights and Conclusions
Removing stains from car upholstery doesn’t have to be a daunting task. With the right techniques and a bit of patience, you can restore your car’s interior to its former clean and fresh state. Remember, addressing stains promptly and choosing the appropriate cleaning method for your upholstery fabric will save you time and effort in the long run. So, whether it’s a stubborn coffee spill or a mysterious smudge, armed with these tips, your car seats will be looking spotless and inviting again—ready for the next journey ahead.
1 Comment
oshfh9